
Project Ebonhold Guide
From your first quest to prestige: XP, ashes, hardcore, gear, affixes, gold, and the full route to chain it all together.
Written by Macumba, WypeFlip guild
Version 3
This guide is for everyone. The guild is not. Raids are called in French, and you will need the language to follow along.
Read on, use everything in here, and come talk to us on Discord in French or English. Just know what you are walking into before you ask for an invite.
If you are starting this server from scratch, be aware that a lot of mechanics get spoiled here. You will lose the element of surprise.
Only read this guide if that does not bother you and what you really want is to be optimal.
Advice: at least go through the leveling phase on your own, at your own pace, before coming back here.
The server's vocabulary #
Ebonhold adds a dozen systems that do not exist in WotLK, and everyone talks about them in shorthand. If a word in this guide throws you, it is here.
Currency and progression
| Term | What it is |
|---|---|
| Soul Ashes, "ashes" | The server's progression currency. Everything is bought with it, starting with the skill tree. It is the counter you will see everywhere. |
| Ash multiplier | The bonus percentage on everything you collect. It goes up with hardcore and above all with prestige. It is the single most important stat in the game. |
| Skill tree | The tree where you spend your ashes. Open it with the /progression command. Careful: nothing is committed until you click Apply Changes (see 1.1). |
| Permanent points | The skill tree nodes that survive prestige, while the rest of the tree is wiped. The only investments that never start over from nothing (see 2.5). |
| Prestige | The server's New Game +: you go back to level 1 and burn your ashes in exchange for a permanent multiplier bonus (see chapter 4). |
Echoes
| Term | What it is |
|---|---|
| Echo | A bonus you gain during a run, and what actually builds your power. It is the heart of your build, independently of your gear. |
| Draft | The moment the game offers you several echoes and you have to pick one. Every draft is a final choice for that run, which is exactly why the wishlist matters. |
| Wishlist | The list of echoes you want. Once imported, they are highlighted during the draft, so you do not need to know your build by heart (see 2.2). |
| Orb of Lost Memories | A targeted reroll: you forget an echo you own and draw another one in its place. This is what forces a specific build. |
Gear and affixes
| Term | What it is |
|---|---|
| Affix | A custom server enchant, applied to a piece of gear. This is where most of your power comes from, far more than the item itself (see 2.4). |
| Enchanted Anvil | The Dalaran NPC where you extract and apply affixes. |
Quests, groups and instances
| Term | What it is |
|---|---|
| Callboard | The repeatable quest board, next to the inns. It is your main source of ashes from mid game onwards (see 5.2). |
| World wide quest | The callboard quests where you have to kill mobs. Those are the ones to take. |
| Hardcore, HC1 to HC5 | World difficulty, which you set yourself. The higher it is, the more ashes, XP and loot you get, and the harder mobs hit (see chapter 3). |
| Ahead of the Curve | The achievement that unlocks the next hardcore tier. It is what people link in raid callouts. |
| LFM / LFG | Looking for members: an existing group wants people, and this is the one you want. Looking for group: one person looking for an existing group. |
| Lockout, Instance ID | The lock that stops you redoing a raid you have already cleared. It can be cleared for ashes, and the price is multiplied by 5 every time (see 5.3). |
/progression opens the skill tree, where all your ashes go. It is the window you will open most often.
/join world gets you into world chat, where every raid callout happens.
Before you start: which class? #
This is your first decision, and in practice the hardest one to undo. You may as well make it knowing what you are doing.
A major class rebalance has been announced. The table below is a snapshot that will go stale quickly: do not build weeks of play on it.
If you are torn between two classes, take the one you enjoy. That is the only criterion that will survive the patch.
To see where things stand, watch the official Ebonhold Discord: that is where patch announcements land.
The server is playable with any class. But if you want the current context:
| Class | Damage | Survival | Author's confidence | Commonly played? | Note |
|---|---|---|---|---|---|
| Death Knight | B | S | S | Very common | Rock solid, almost unkillable. |
| Priest | B | A | B | Uncommon | Safe, and does acceptable damage. |
| Paladin | B | A | A | Very common | Very versatile, can tank anything, and does acceptable damage. |
| Shaman | A | B | D | Rare | Can hit very hard. |
| Mage | S | C | C | Uncommon | Hits very hard. Has spells to avoid dying outright, but no regen. |
| Hunter | S | C | D | Rare | Can hit really hard. |
| Rogue | B | D | D | Rare | Can hit hard, but little regen and energy is very hard to manage. |
| Druid | D | B | C | Uncommon | Only bear is acceptable for damage: balance is mediocre, feral is bad. |
| Warlock | C | B | C | Uncommon | Few upsides. Demonology looks decent, the pet keeps it standing. |
| Warrior | S | D | A | Very common | Hits really hard, but very fragile: it often gets one-shot without anyone quite knowing how, all the more so in melee. |
Damage, survival and confidence are graded from S (best) to D (worst). Author's confidence does not rate the class but the row itself: a D flags a thinly supported estimate, for lack of seeing enough of them to call it.
The known strategy for unlocking Hardcore 2 in Ulduar relies on a DK (see 3.1). If you play one, that can open doors on the tier that blocks everybody.
01 The XP phase #
The goal of this phase: reach 80 without spending a week on it, with enough ashes to start everything else.
1.1 What to take in your skill tree #
Right at the start, your first million Soul Ashes goes into two branches, and two only:
You have nothing yet, and that is normal. The fastest way is to take characters to level 15, queue their 3 dungeons for the crates, then start over on a new character.
The full recipe is in 5.1 and takes five minutes to read. Come back here afterwards to know where to spend.
- Survivability: so you do not melt on the first mob pack you meet.
- XP: because everything else in this chapter depends on how fast you level.
Some nodes in this tree are permanent and survive prestige. Leave them alone for now: you start feeding them at mid game, a little at a time, and they become the priority the moment you aim for end game. See 2.5.
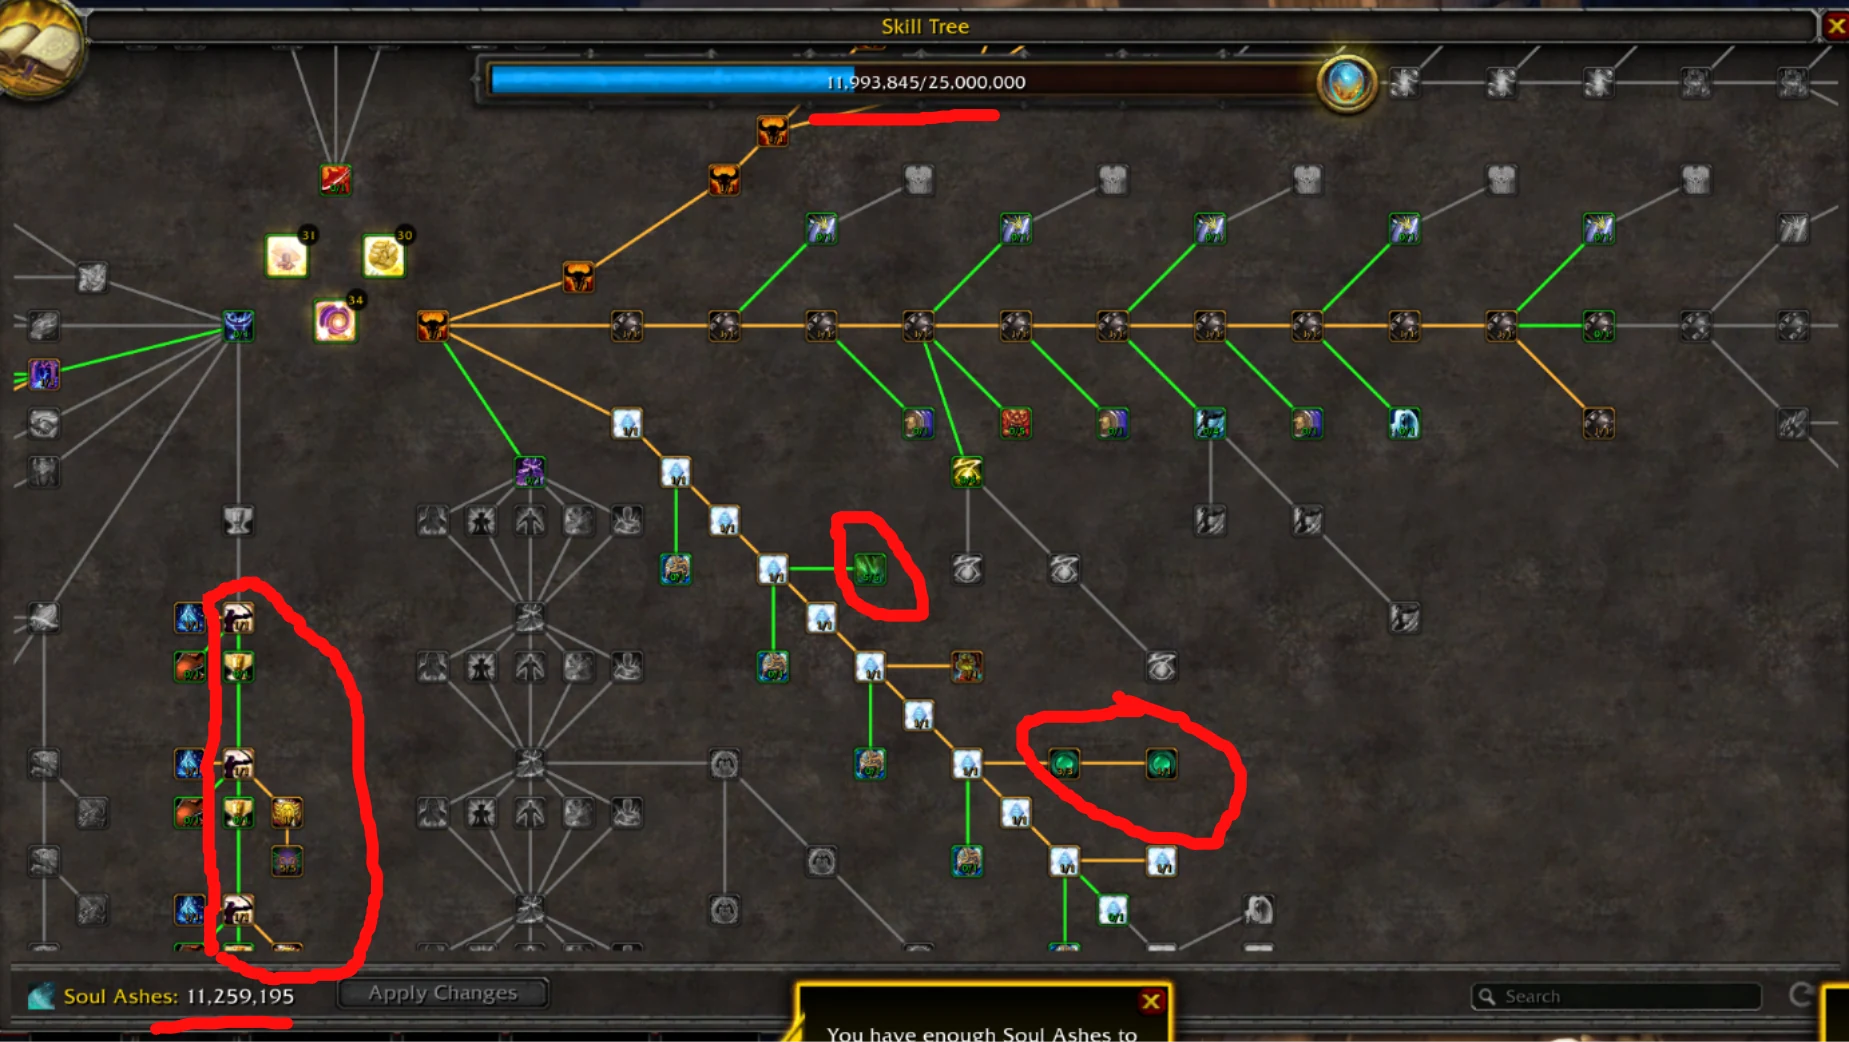
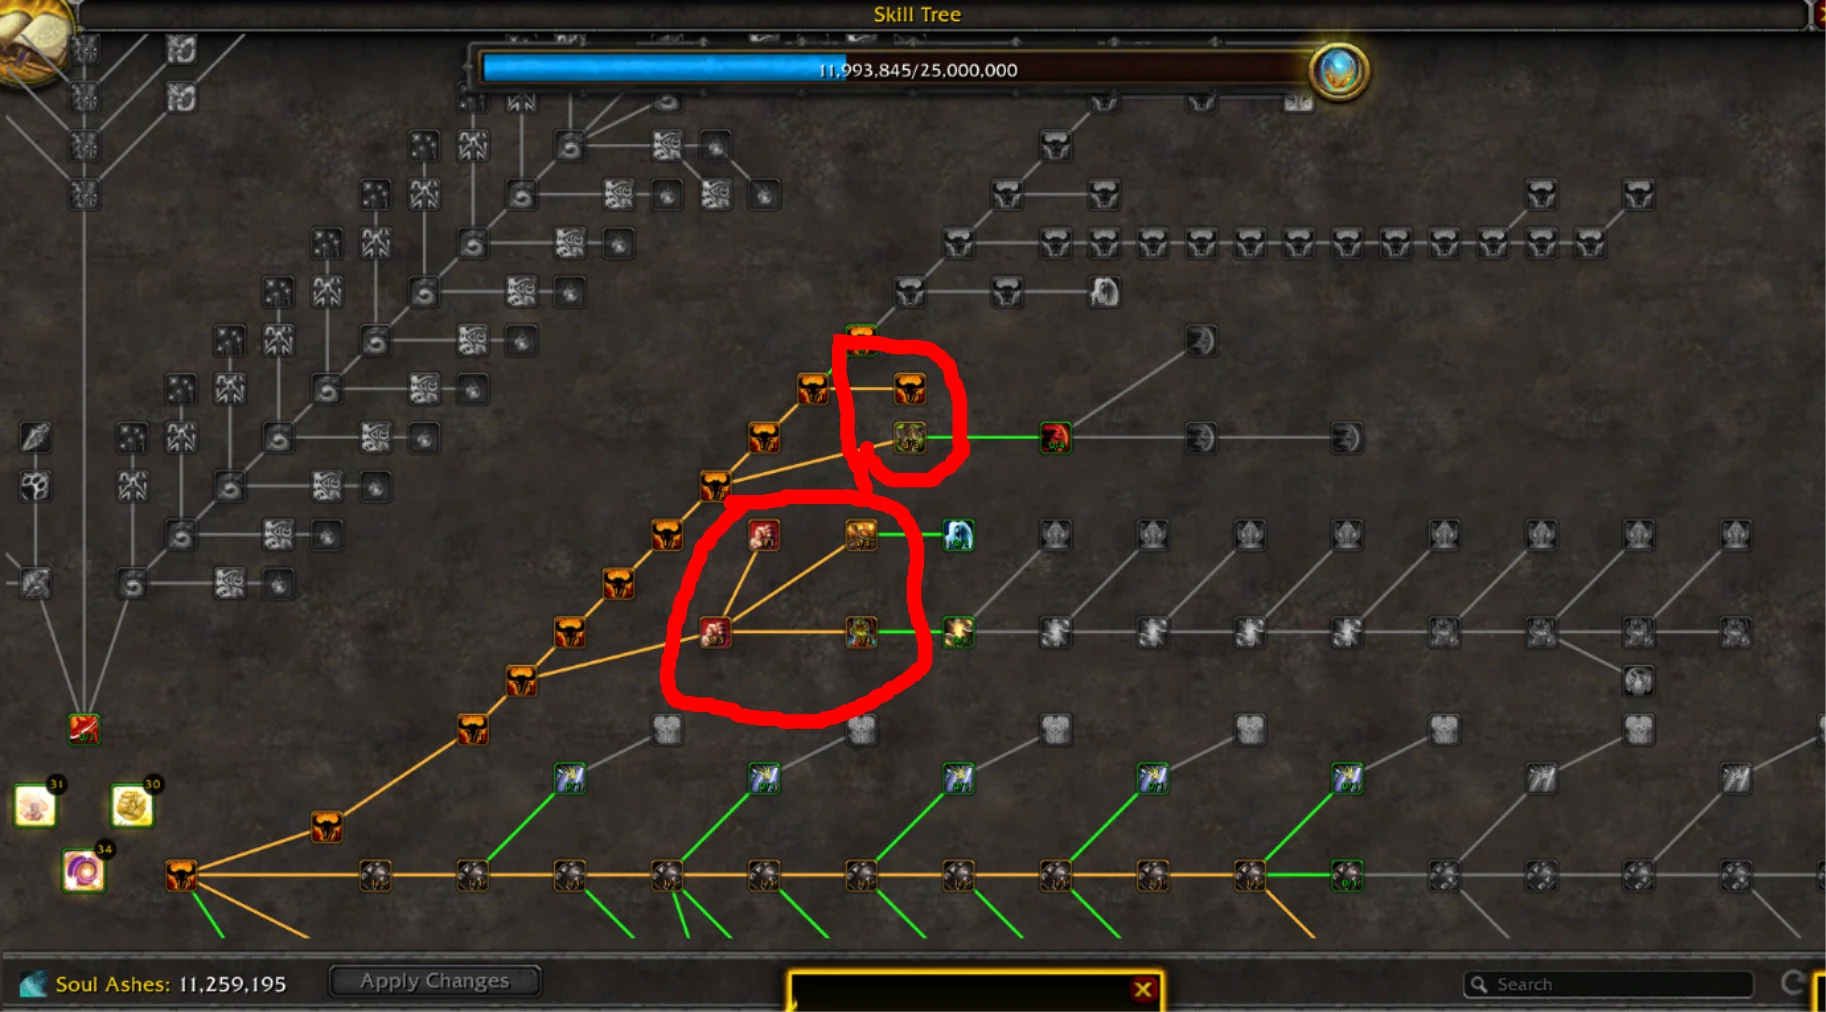
The main survivability nodes, the ones circled in the screenshot, cost me only 700,000 ashes. That is within anyone's reach very early, and it completely changes the leveling phase.
Remember Apply Changes: nothing is committed until you press it.
1.2 The quests that save you time #
Some quests give a completely disproportionate XP return for the level you take them at. This is not a small bonus to pick up along the way: they replace most of your leveling. The mob grinding in 1.3 is only there to finish the job.
All factions
These are the best ones, because they work whichever side you are on: no more picking a faction based on leveling. Do them in this order, the end of the chain depends on the start.
You need the flying mount, that is the only prerequisite. The first two already do most of the work: if your hardcore is high you can drop off early, otherwise run the whole thing. The rule is just below.
- step 1Learning to Leave and Return... the Magical Way
- step 2The Champion's Call!
- step 3Monitoring the Rift: Cleftcliff Anomaly
- step 4Monitoring the Rift: Sundered Chasm
- step 5Monitoring the Rift: Winterfin Cavern
- step 6Corastrasza
- step 7Aces High!
Aces High! can be turned in straight away, without doing anything. No need to go do the flight: talk to the NPC and hand it in. Just remember to select the reward, otherwise the turn-in will not go through.
And you can pick it up and hand it in again right after, on a loop. This works for both factions.
It sits at the end of the chain, so you will only see it if you run the whole thing, which is the recommended path as long as your hardcore is not high.
What it looks like with a stopwatch
A real run, from zero, in Hardcore 5, with every XP bonus. The time shown is elapsed time since the start, not the duration of each step:
| Step | Elapsed | Level reached |
|---|---|---|
| The first 2 quests, picked up and turned in | 1 min 16 | 63 |
| The Monitoring the Rift chain | 3 min 22 | 70 |
| The end of the Corastrasza chain | 4 min 01 | 73 |
| Trip to Dalaran, switch to HC1, then mobs | 5 min 20 | 80 |
Level 63 in 1 min 16 with two quests is the order of magnitude to remember. On that run I pushed the chain to the very end, but in hindsight that is not what I would do again: the last 7 levels cost almost as much time as the first 73.
The rule, once you have digested all that
Two phases, two settings, and one switching point:
- As many quests as possible, at the highest hardcore you have. Turn-in XP scales with your hardcore tier, and handing a quest in requires killing nobody: you bank the maximum without ever facing HC5's inflated mobs.
- If your hardcore is already high, stop questing around level ~62 and go hit mobs in the usual spot (see 1.3; for that bracket, the Vengeful Taunka Spirit). There you do have to kill, so HC5 becomes counterproductive: mobs have far too much health for a character fresh off the quest chain. HC1, already ~8× normal XP (see 3.2), wins on actual throughput.
- Otherwise, do not drop off: run the whole chain to the end. That is the callout just below.
In other words: the highest hardcore available is not always the right call. It is for quest turn-ins, not for grinding.
Do not read the table above as something reserved for veterans. This chain is even better on one of your first characters, on one condition only: having the flying mount.
Without Hardcore 5 or permanent bonuses, the rule simply changes shape: do every quest, do not drop off at 62, and climb as high as you can with them. You will go much, much faster than with classic leveling.
Switching to mobs only makes sense once your hardcore is already high: that is what makes grinding better than the rest of the chain. Without it, the chain stays ahead all the way.
Alliance only
On the Alliance (A2) side, start with this chain, which is still a huge accelerator:
Then this one, picked up in Dalaran:
- in DalaranPreparations for War
Horde only
On the Horde (H2) side, take this one, in Dalaran as well:
- in DalaranPreparations for War
As of today, no Horde chain comparable to the three A2 quests is known. This is not an oversight in the guide: there is nothing more to take.
It is not a real handicap, because most of the work is done by the all-faction quests above. Move straight on to the routes in 1.3 afterwards.
If you find a Horde chain, say so on the WypeFlip Discord and tag @Macumba, in French or English.
1.3 Mob routes for fast grinding #
A route is a zone where mobs are dense and worth your time for your level bracket. "Weak / average / strong" refers to how powerful your character is, not its level: a well-geared character can take a zone far earlier.
| Mob | Zone | Weak char | Average char | Strong char | Note |
|---|---|---|---|---|---|
| Shadowpine Hexxer | Ghostlands | 1 → 25 | — | — | |
| Razorfen Battleguard | The Barrens | 20 → 43 | 1 → 43 | — | |
| Glasshide Gazer | Tanaris | 30 → 50 | — | 1 → 50 | Next to the Caverns of Time. Far better in HC1; on normal it is not worth the time. |
| Skeletal Flayer | Western Plaguelands | 40 → 60 | 40 → 60 | 1 → 60 | North of the zone. |
| Bonestripper Vulture | Hellfire Peninsula | 50 → 70 | 50 → 70 | — | |
| Vengeful Taunka Spirit | Borean Tundra | 60 → 80 | 60 → 80 | 60 → 80 | The switching spot from 1.2, from level ~62 onwards. |
A dash does not mean "it does not work": it is a case I did not measure, usually because there is nothing special about it.
If you loot the corpses, mobs respawn faster. Having autoloot genuinely changes the rhythm of a route, and you can also find it on the auction house.
1.4 For veterans who do not want to think #
If you do not want to optimise bracket by bracket, just chain these three zones in order. This is the no-brainer route covering 1 → 80:
- step 1Razorfen Battleguard
- step 2Skeletal Flayer, to the north
- step 3Vengeful Taunka Spirit
Run it in Hardcore 1 at minimum if you have unlocked it: mob XP there is roughly 8 times faster than on normal (see 3.2).
1.5 Power leveling #
If you have a big character, or a friend willing to carry you, power leveling runs 1 to 80 in a single zone:
- PL 1 → 80Umbral Brute, there are usually people around.
It is the same zone used for gold farming (see 6.2), so whoever is carrying you is not wasting their time.
In hardcore, mobs throw out spells that splash everywhere. The low-level player being boosted gets clipped by that stray damage and dies, without doing anything at all.
If the zone is too violent, send the boosted player to the Frozen Elemental mobs in Dragonblight instead: there, nothing will touch them.
02 Your first steps at level 80 #
You are 80, naked and broke. Here is the order to do things in.
2.1 Farming your first millions of ashes #
You have just hit 80. Here is the loop to start immediately, in this order:
- Your 3 daily dungeons, through the queue. Each one gives a Soul Ashes Crate, and the whole thing takes about fifteen minutes.
- The callboard once the dungeons are done: the board next to the inns, on the mob-killing quests.
- The highest hardcore you can hold, because that is what decides everything else (see chapter 3).
If you queue dungeons while leveling, they already count towards your 3 daily dungeons. Result: no crate once you are 80. Save your 3 queues for level 80.
This loop stays the same from start to finish, only the return changes. How much a crate is worth, how to reroll the callboard, when to switch to raids: it is all gathered in chapter 5 so it is not said twice.
2.2 The Echoes system: build, wishlist and orbs #
Where to find optimal builds, affixes and gear
For the builds themselves, go to the official Ebonhold Discord and take the one for your class. You can obviously roll your own and experiment.
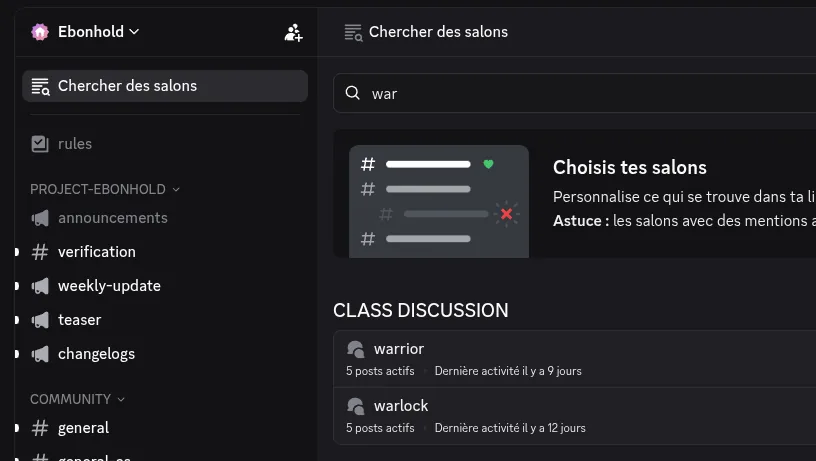
This is the question I get asked most, so let us settle it here: class channels are not in the left-hand list. You have to go through Browse Channels, at the very top of the sidebar, then type your class name. The Class Discussion forums come up, and that is where Echoes builds, affixes and gear pieces get shared.
Saving and importing your build
The Echoes system lets you save loadouts. Save your build: once you are 80, getting your setup back in one click changes everything.
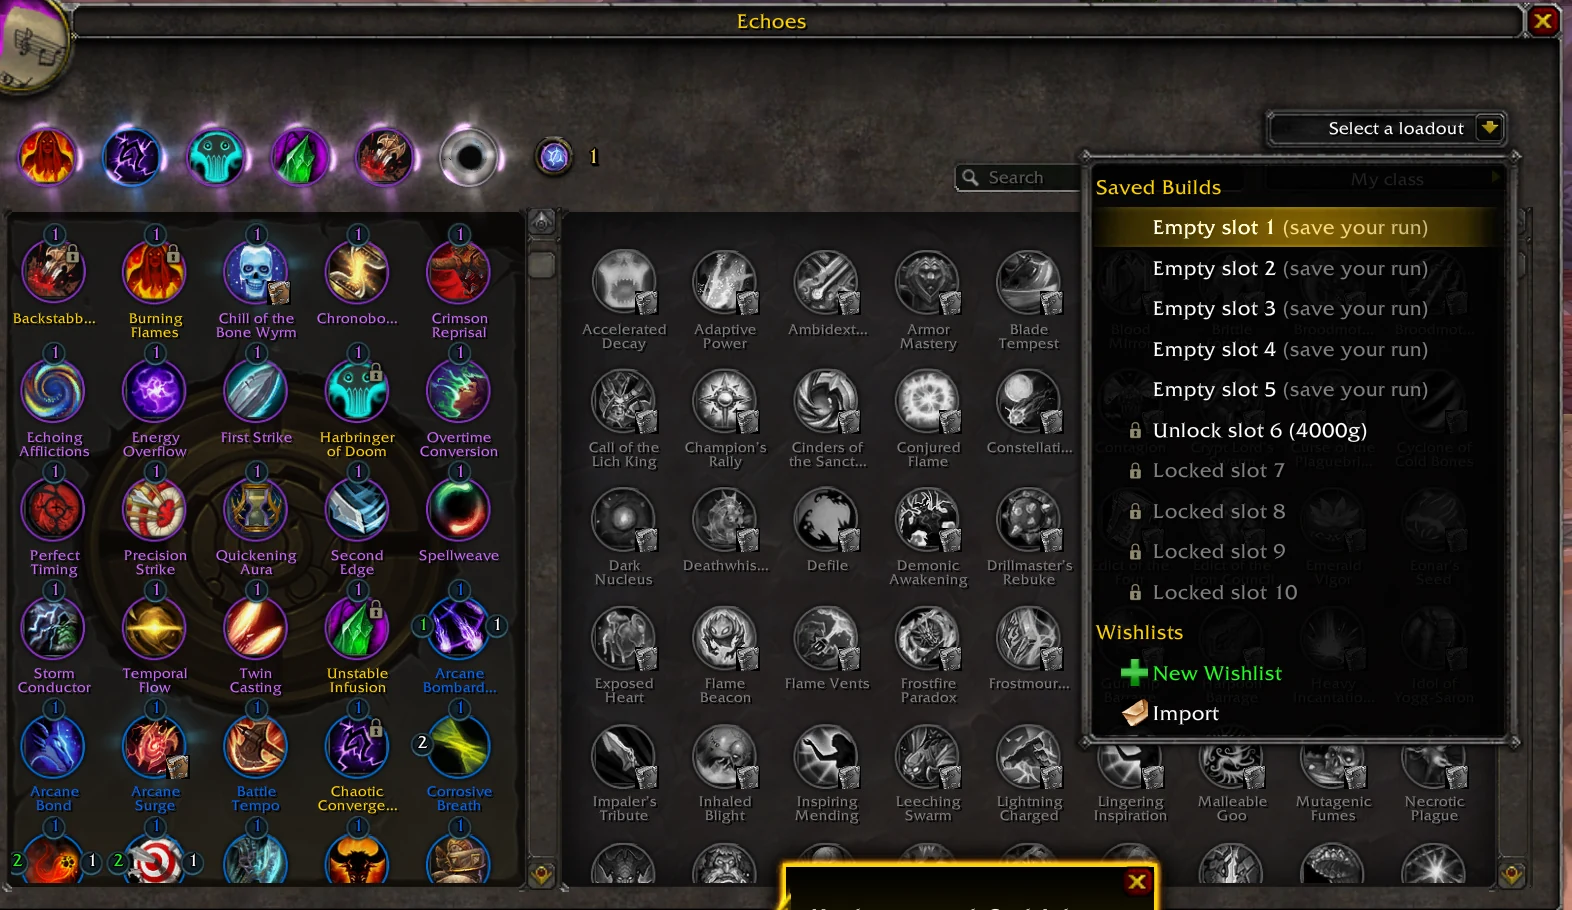
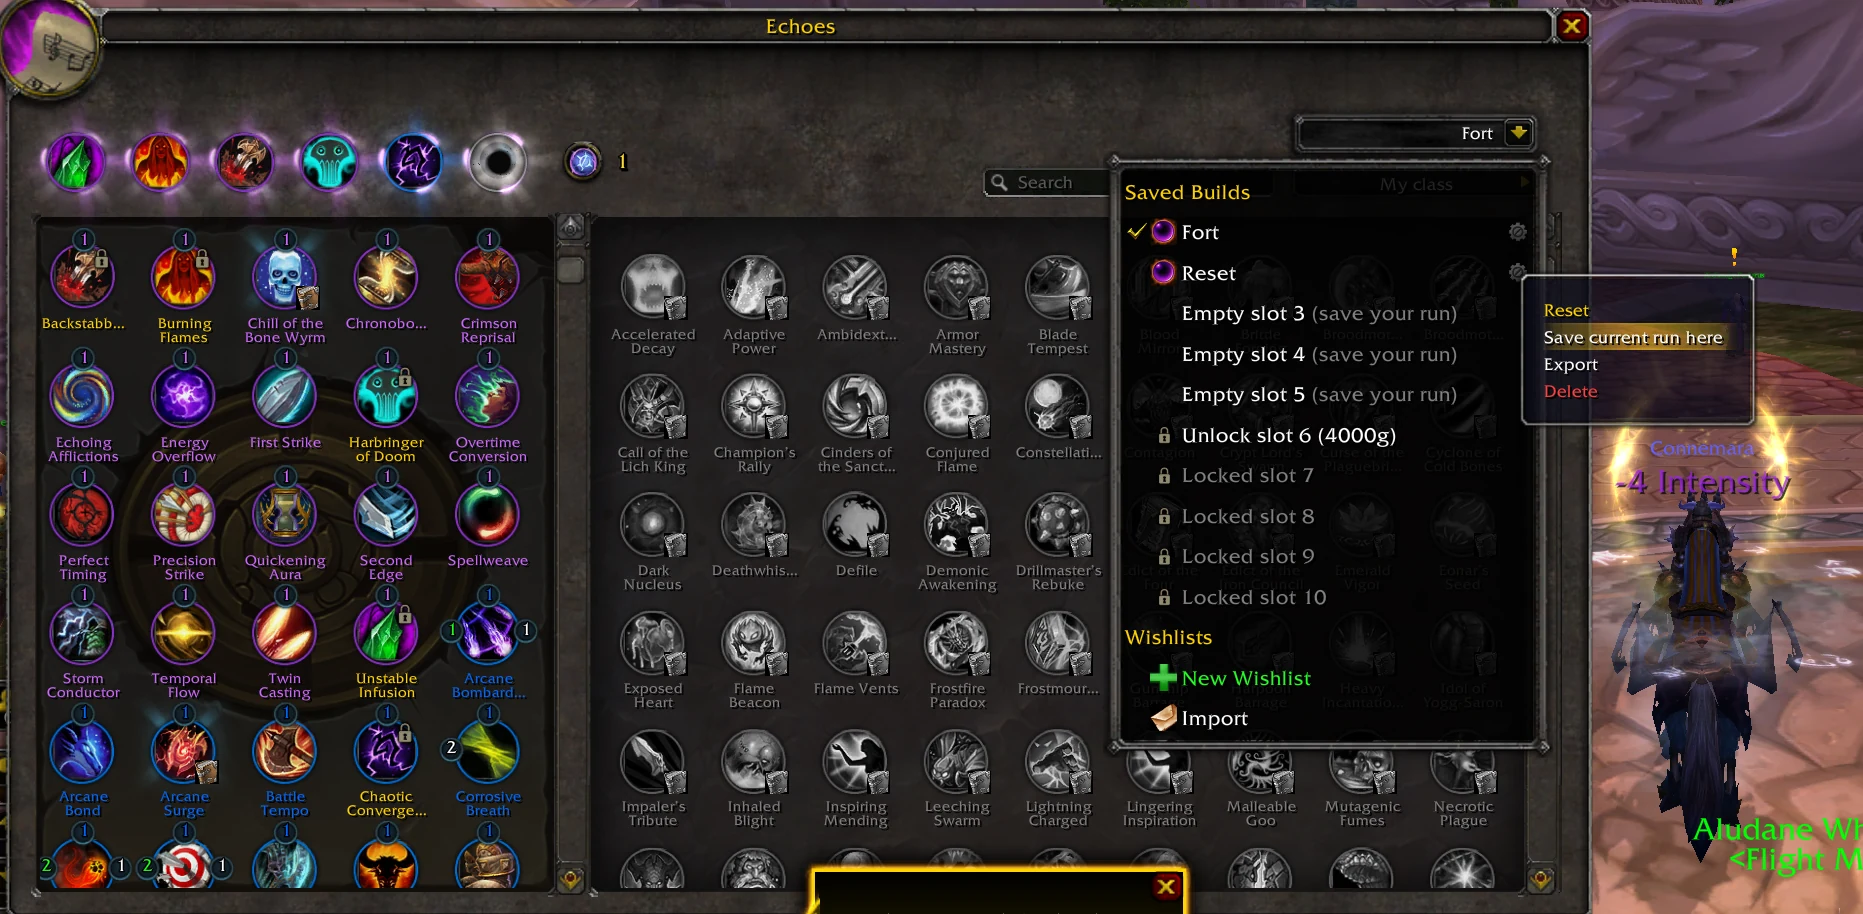
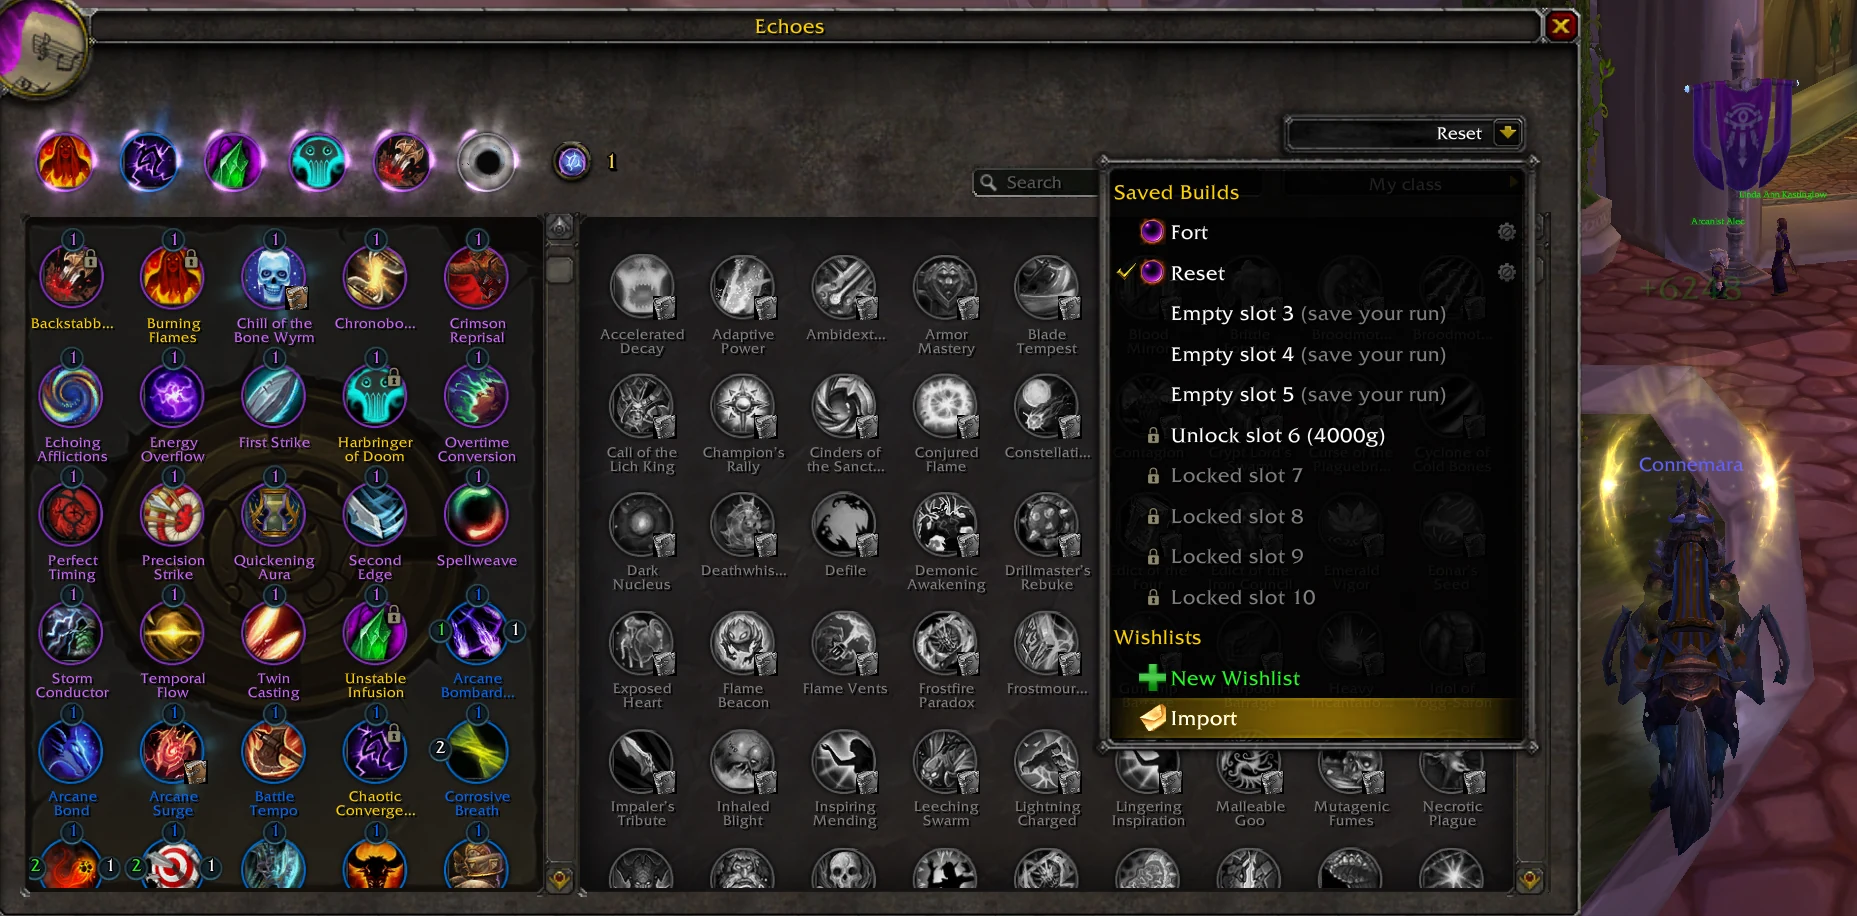
A build is imported as a string of characters, like this one:
Example: the Warrior "DeathrageV4" build. It is here to show the format of the string, not to recommend the class: see the intro table.
The wishlist: getting guided during the draft
Once a wishlist is imported, the echoes you need are highlighted at the moment you choose. No more knowing your build by heart mid-draft.
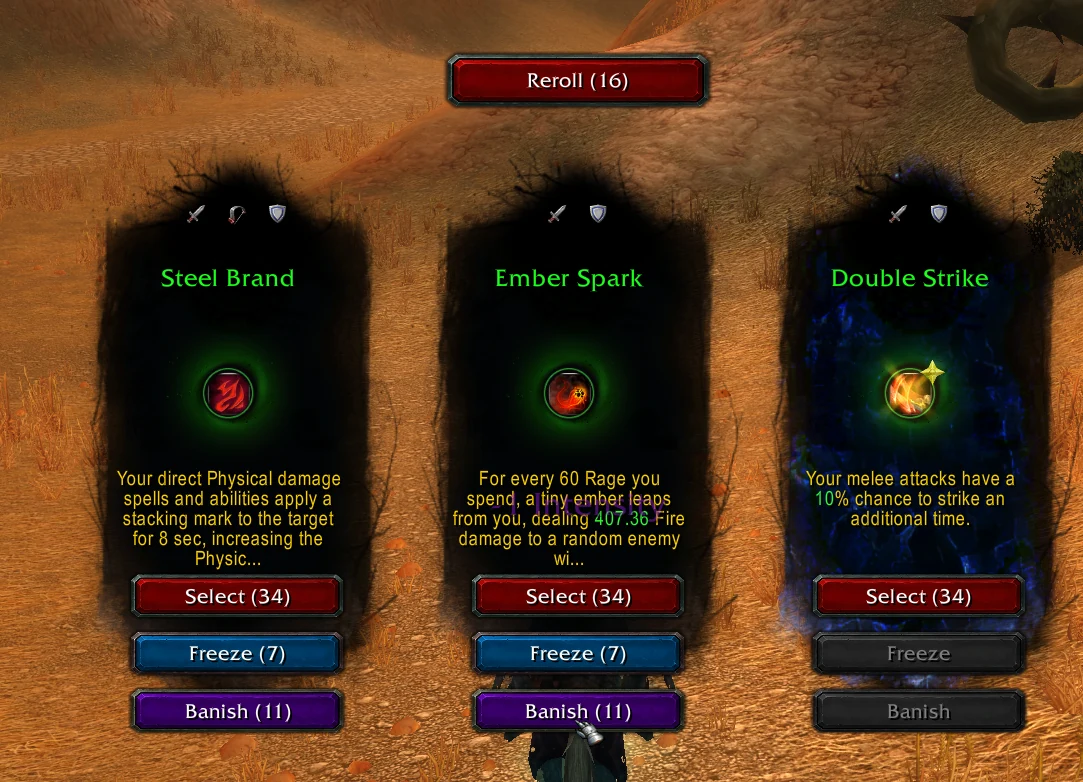
The blue background is unrelated: it comes from the Freeze I had already clicked, which is also why its Freeze and Banish buttons are greyed out. Visible costs: Select 34, Freeze 7, Banish 11, Reroll 16.
If your build is already dialled in, there is an option that accepts echoes automatically. Exact path:
Esc → Interface → Project Ebonhold → Perks & Visual → Auto accept echos from your active build
Disabling junk echoes
Very important. Once you have a lot of echoes unlocked, some of them are bad and they pollute your build and above all your draft offers. You need to remove them.
A right-click on the echo in your build toggles it between enabled and disabled. The strategy that works: disable everything except the few echoes you actually want, so the draft only ever offers you those.
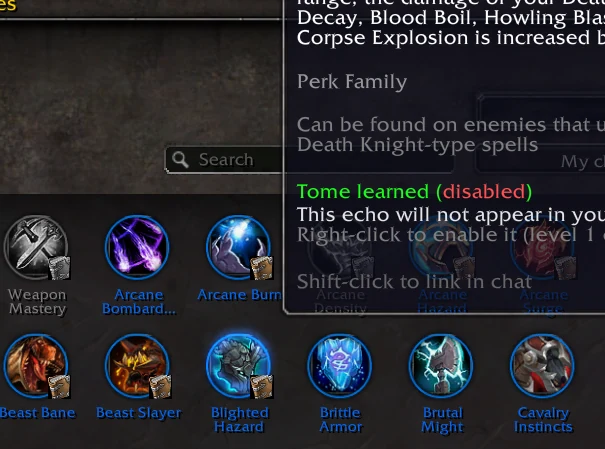
At level 1 only. The tooltip is explicit: level 1 only. You cannot do the housekeeping mid-run, it has to happen at the start of a game.
Only echoes with the little book. Only the ones whose tome you have learned (Tome learned) can be toggled. The rest, you are stuck with.
Orbs of Lost Memories
One of the most recent additions, and a very important one. An orb gives you a targeted reroll on a single echo: you forget a stack of an echo you own and draw a new choice in its place.
This is what turns the luck of a draft into the build you actually wanted. So stack them as high as you can: the day you are chasing a specific build, you will have what it takes to force it.
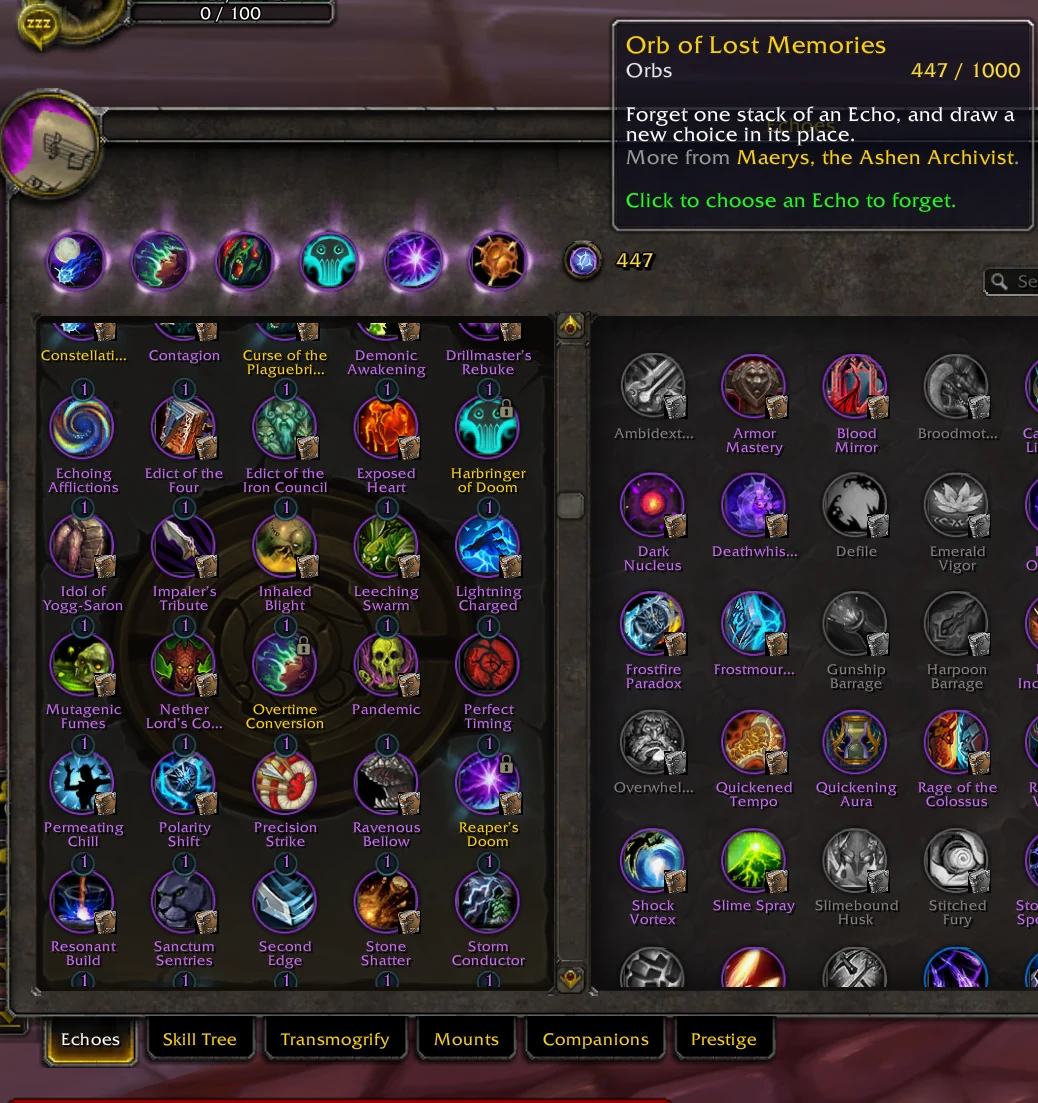
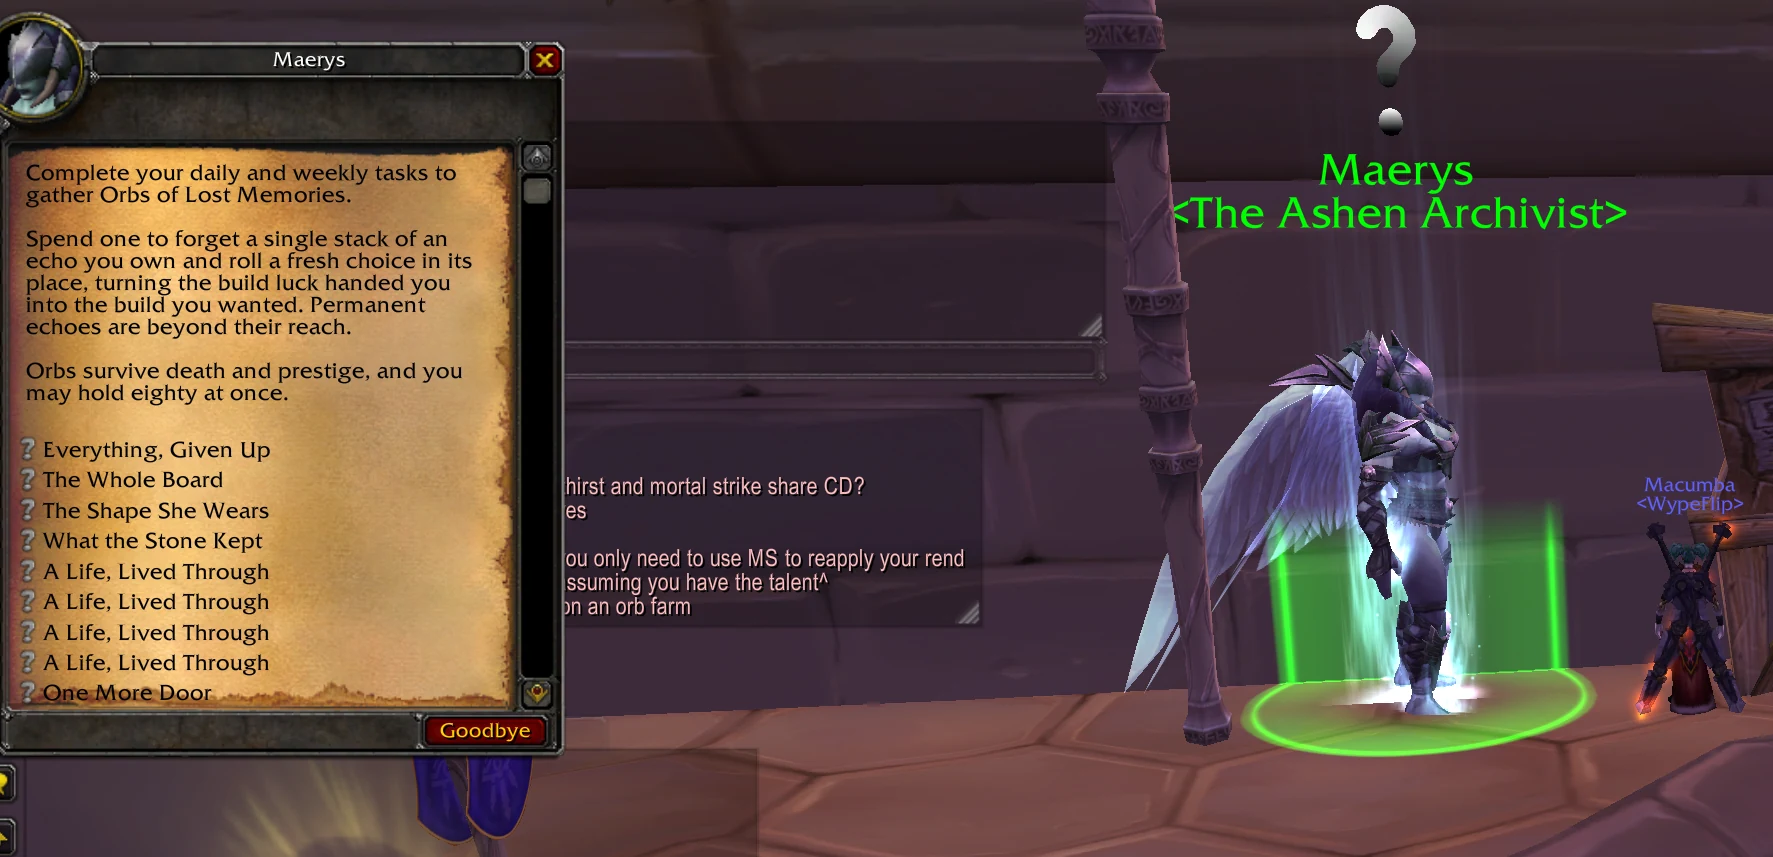
Maerys stands next to every callboard, so in front of the inns. If you know where to pick up your quests, you already know where she is.
To farm them, the simplest route is your daily and weekly quests. She hands out orbs in batches of 8. And above all: remember to turn them in, otherwise you get nothing.
- Orbs survive death and prestige. Nothing is lost when you start a new run.
- Permanent echoes are out of reach: an orb cannot reroll them. Those are the ones that hold through prestige, so the ones you keep from one run to the next.
- The observed cap is 1,000 (screenshot above: 447 / 1000). The NPC's dialogue says eighty, but the in-game counter contradicts it.
The real farming method: 5 players in HC5
Dailies keep you going, but the volume comes from somewhere else. The recipe:
- Get a group of 5 players together, all in Hardcore 5.
- Queue Trial of the Crusader on Normal.
- You collect 5 orbs every run. Repeat.
Hardcore is on you, not on the instance. You are in HC5, but you queue the raid on Normal: that mismatch is what makes the loop fast. Do not launch it on a higher difficulty.
You still need to be solid. Five players in HC5 are still five players in HC5: if the group is too fragile, it does not go through. See the requirements in 3.4.
2.3 Getting some gear: what is best? #
Go run raids: it goes quickly. The most optimal gear sets are often obscure, with pieces coming from Classic and all over the place, but do not get stuck on it.
Those piece lists circulate in your class channel on the official Discord: see 2.2 for how to find it.
This phase goes fast, and above all: it is not the gear that counts, it is the affixes you are going to put on it. Move straight on to the next section.
2.4 Affixes: which ones to focus first #
Very, very important. With decent gear, you can apply a custom server enchant called an affix. This is what gives you all of your DPS and your buffs. An absolutely central part of this server.
To find out which affixes players of your class are aiming for, it is the Discord class channel again: see 2.2.
Where and how
Everything happens at the Enchanted Anvil, in Dalaran.
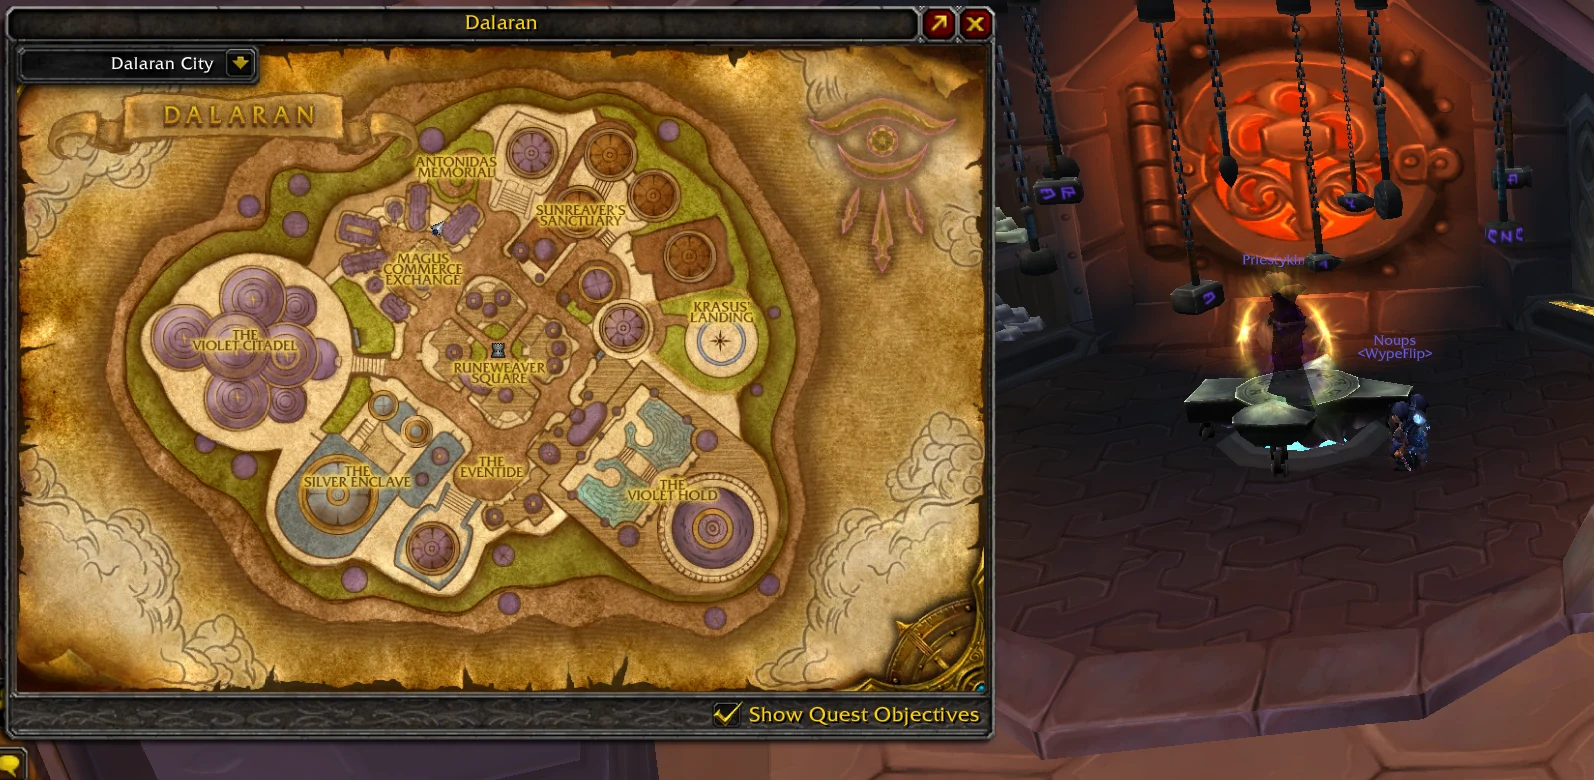
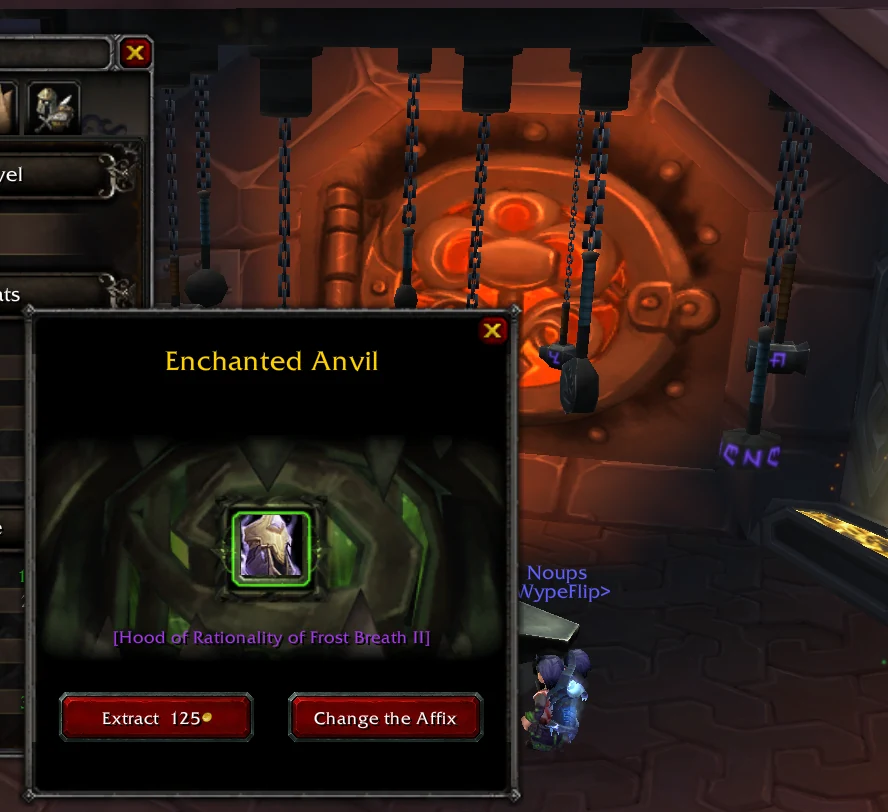
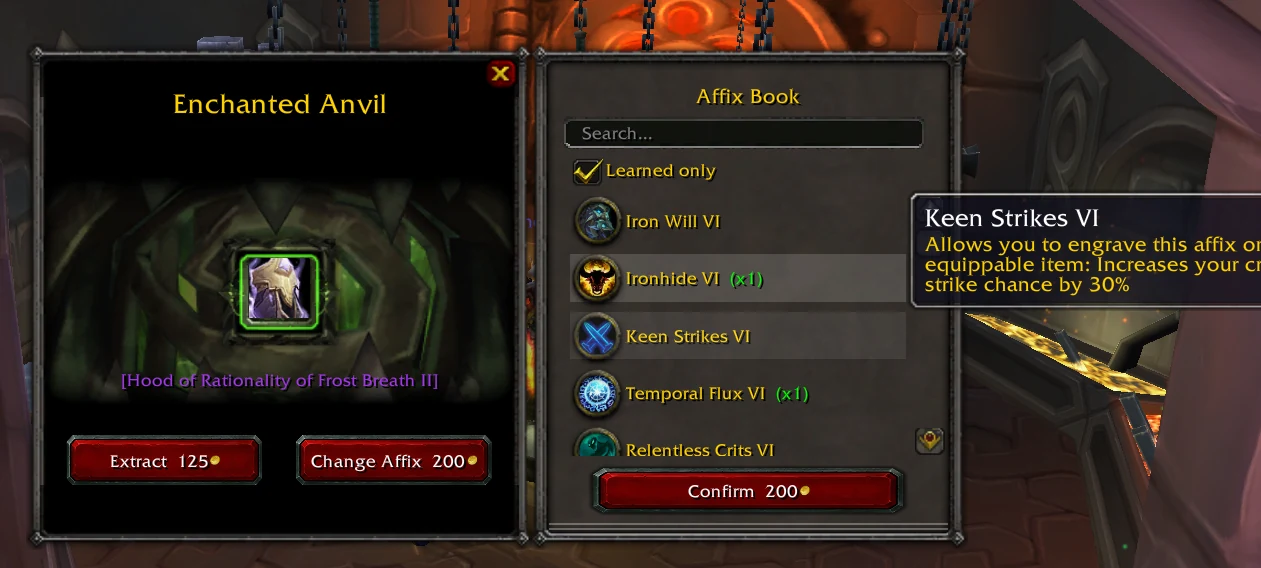
Extraction is expensive: count ~1k gold per extraction. Plan for 15k gold to be comfortable and have a bit of everything. If you go through the auction house, the bill is closer to 40k gold.
The rules to know
- One unique affix per gear set. You cannot stack the same affix at the same rank six times: it will only count once.
- But ranks count separately. Stalwart VI, Stalwart V and Stalwart IV are three different affixes, and all three stack. That is exactly what lets you pile up survivability (see 3.4), and it is the detail everyone misses when reading the rule above.
- Green items often cannot be affixed. Classic trap: favour crafted gear.
- Once extracted, an affix is reusable on any item, as many times as you want. That is exactly why this phase is not one to skip.
How to get them
- In hardcore mode, looting from mobs, which is the main source.
- On the auction house, but be warned: some items go for 3 to 8k gold each.
There is no real reference price: go look at the auction house to get a feel for the moment. Everything looks expensive, but you get rich fast on this server, so do not get stuck on it. - By asking a generous guild. If you ask for help, hand over the gear pieces to put the affixes on directly, and slip in ~5k gold as a gesture: it covers the application costs and noticeably improves your odds of getting everything.
Finding bases to affix: purple shirts and tabards
Before applying anything, you need something to apply it to. The best ones are not armour pieces: they are epic shirts and tabards. Two slots that normally do nothing, and that here carry real affixes.
They are not found where you would look for them. The method: go hit starting-zone mobs in Hardcore 5. At that difficulty they drop items that were clearly never meant for them, epic shirts among them.
- exampleMana Wyrm, to farm in Hardcore 5.
The hardcore loot bonus applies everywhere, including on level 1 to 10 mobs nobody touches any more. You are multiplying rolls on loot tables the server never rebalanced.
So it is fast, risk-free farming: those mobs stay trivial for a level 80 character, even in HC5.
What to put on when you are starting out
| Affix | Effect | Why |
|---|---|---|
| Ironhide VI | +60% stamina | The foundation of your health pool. |
| Stalwart VI | 30k shield / 12s | Absorbs damage spikes. |
| Thick Hide VI | +16,000 armour | Cuts all incoming physical damage. |
This trio does one thing only: stop you getting one-shot while you are starting out. Once you have more gear and more affixes in hand, build your own combinations or follow a class guide.
2.5 The permanent skill tree, to feed from mid game onwards #
In the skill tree, some nodes are unlocked permanently: they stay yours even after a prestige, while the whole rest of the tree is wiped. They are the only investments that never start from nothing, and therefore the most profitable over time.
Do not throw yourself at it on day one. Your very first ashes go into surviving and leveling fast (see 1.1): a permanent point helps you with nothing until you have a run worth preserving.
From mid game onwards though, once your first millions are behind you, start putting a little in regularly. Not all at once, just a bit each time. It buys you versatility: this is the only part of the tree that stays yours no matter what, so every point placed there is a point you will never pay for again.
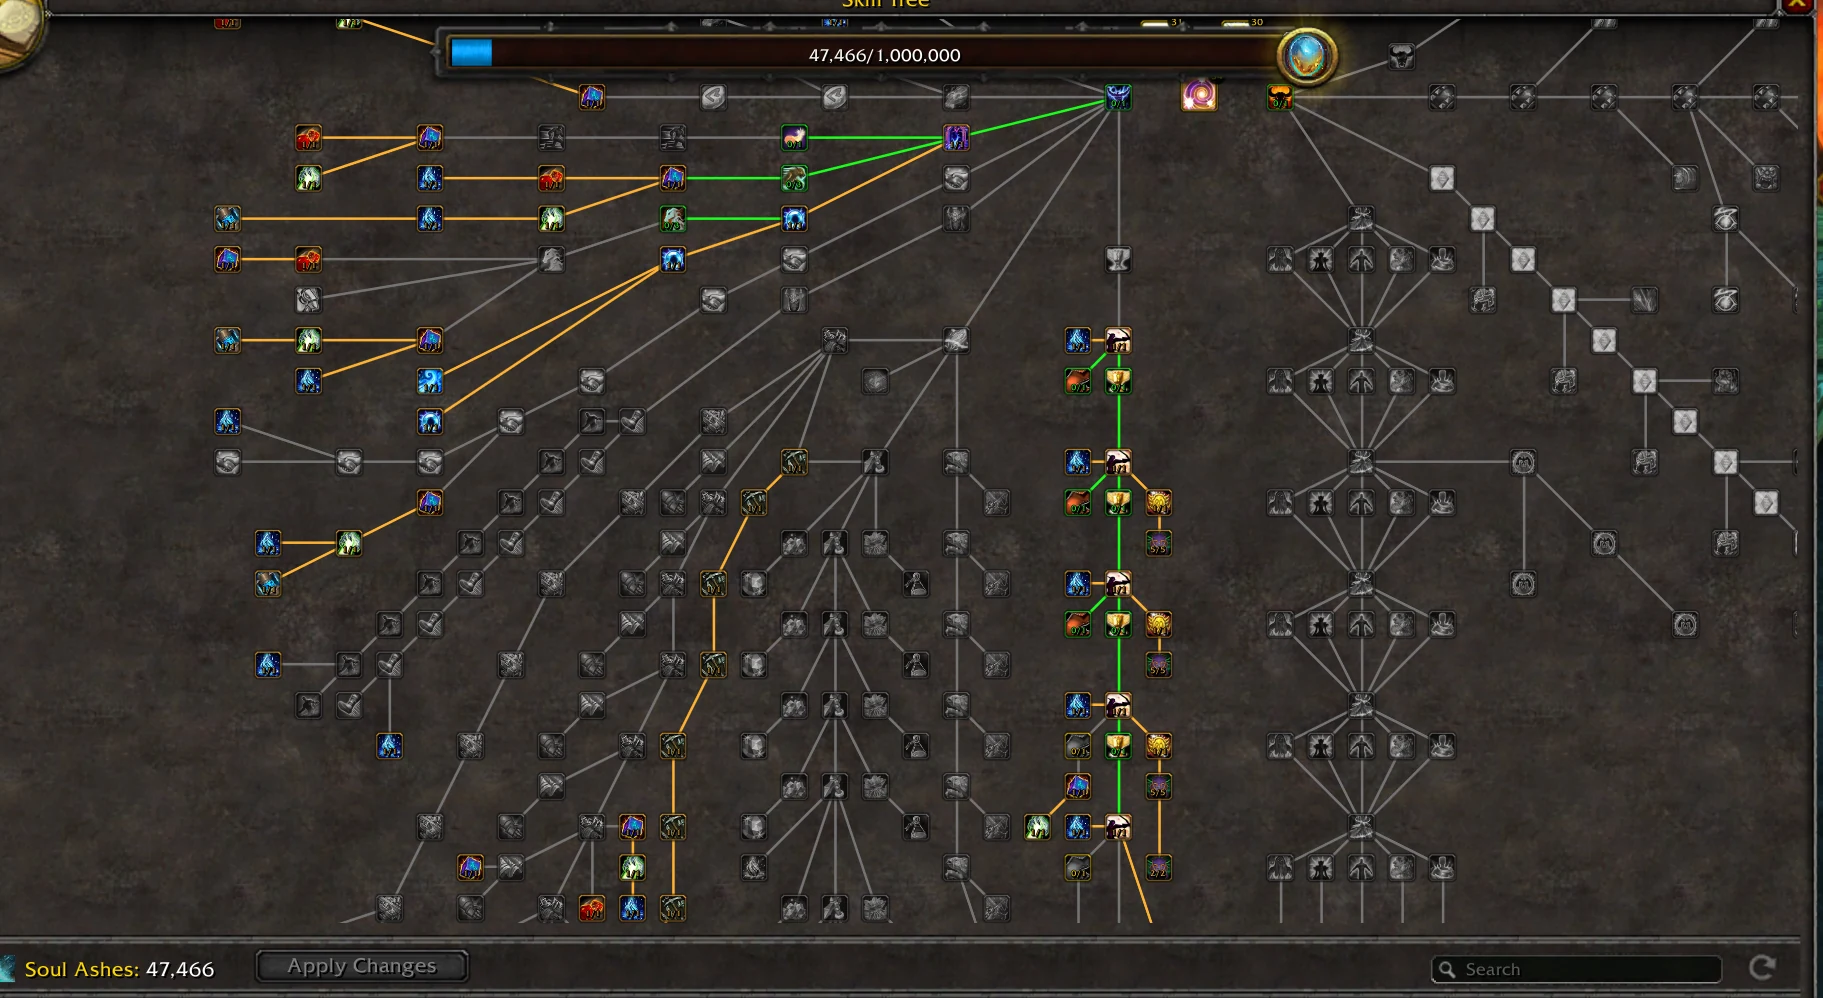
Borrowed Power, the node that changes everything
The one to target first is called Borrowed Power. It lets you keep your level 80 gear while you are level 1.
In other words: you prestige, you restart at level 1, and you are fully geared from the first mob. It is the direct answer to the stat wall in 4.4, and what makes the prestige loop fast instead of a chore.
Once the permanent tree is in place, I go from level 1 to 80 in 6 minutes killing mobs, and I farm the 10.77M ashes in 9 minutes on the callboard at 1,000% multiplier.
Do not take these times as your first run. They assume the permanent tree unlocked, Borrowed Power, and a big multiplier behind it. That is the target, not the starting point.
| Tier | Approximate cost |
|---|---|
| The first few points | ~1M ashes |
| Unlocking everything | ~20M ashes |
The ~20M to unlock everything is well within reach before you even meet the prestige requirements in 4.2, which ask you to have passed 100M. So you have the whole of mid game to chip away at it, without ever starving the rest.
The one real deadline: Borrowed Power must be unlocked before your first prestige, not after. It decides whether your first post-prestige run is smooth or painful.
03 Hardcore mode #
This is the most important part of the server. Everything else in this guide depends on it.
3.1 How to unlock it #
How it works
In a capital city, or in a starting zone before level 10, click the mode shown (Normal) just above your ash counter. That opens the world difficulty window.
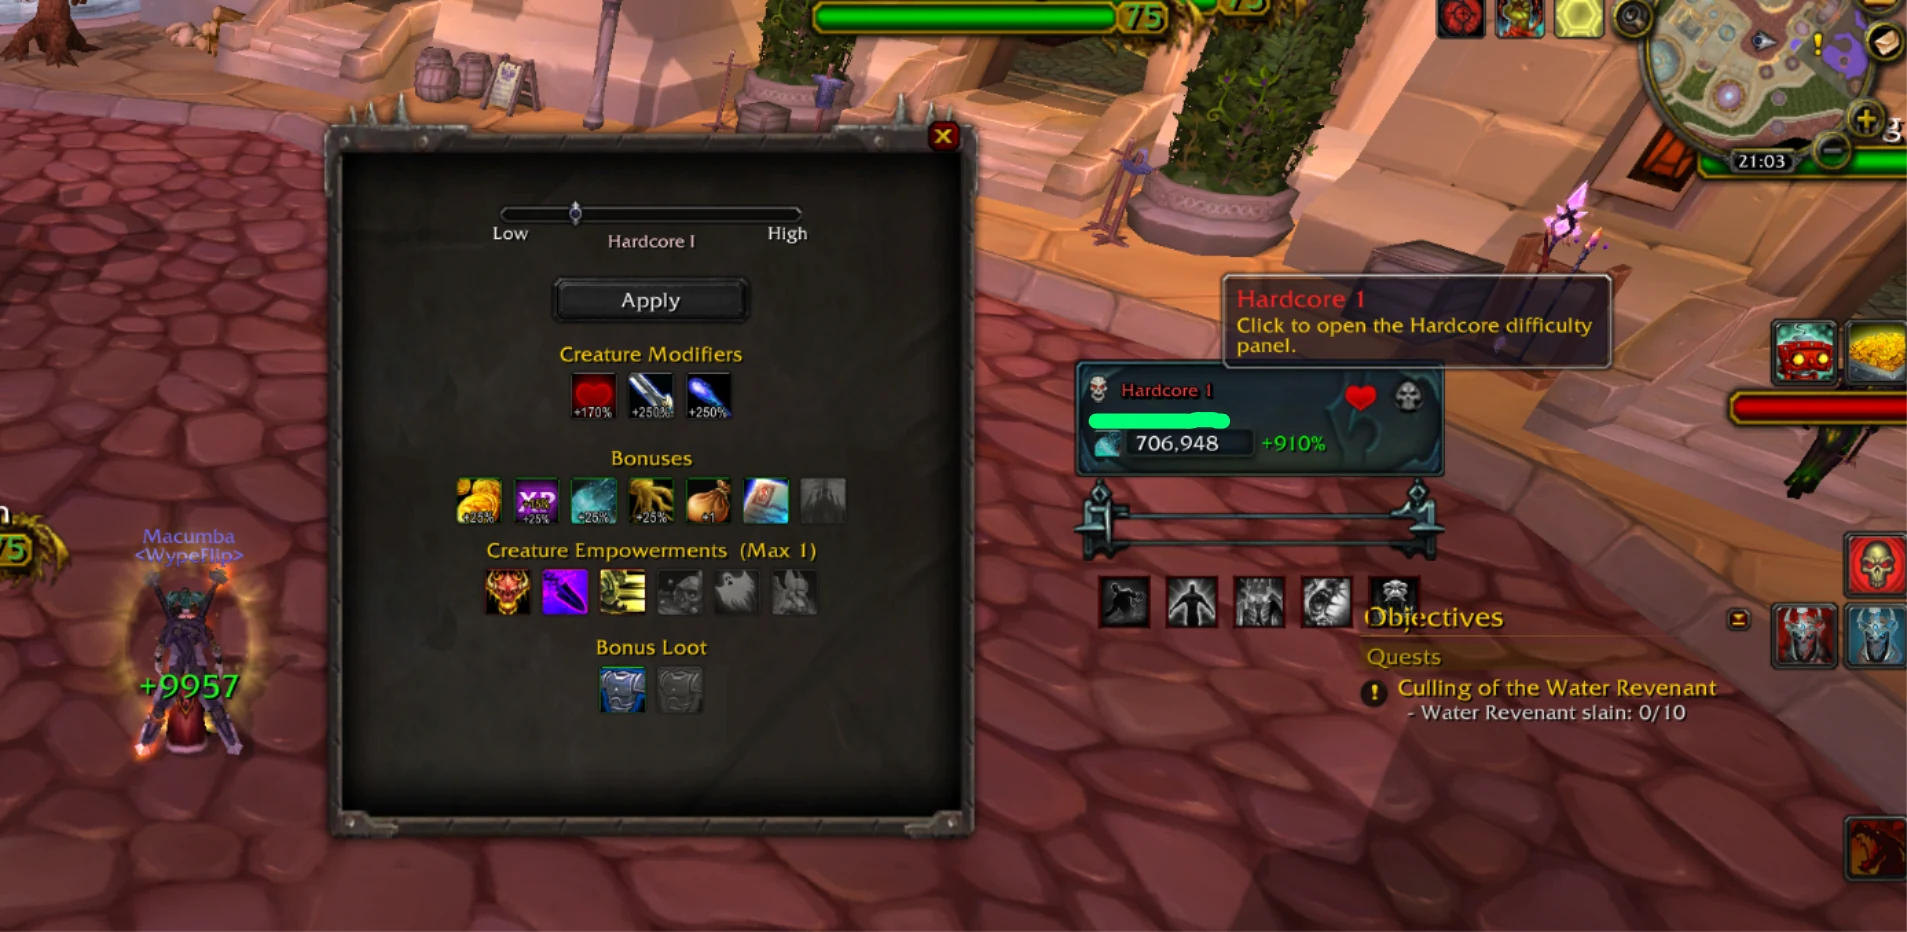
Once unlocked, the tier is available on all your characters. And you keep that world tier no matter what: prestige, death, it does not matter.
The raids to do
Each tier is unlocked by clearing a raid in the previous tier:
- Naxxramas in 25 normal or heroic to be done on Normal
- Ulduar in 25 normal or heroic to be done in Hardcore I. The server's real bottleneck, and nobody wants to run it
- Trial of the Crusader to be done in Hardcore II
- Icecrown Citadel to be done in Hardcore III
- The Ruby Sanctum to be done in Hardcore IV
This is why the HC2 tier blocks everybody. On the last boss you need a death knight dedicated to tanking the tentacles that reflect spells, and you need the Freya debuff. This is not a raid you improvise with strangers.
Concretely: if you cannot find an organised group, this is where your progress stops. Hence the value of going through a guild (see 3.3).
For each of these raids, what matters is killing the last boss. Even dead, it counts for you. So if the raid is going fine without you, stay dead until the end, you will still get credit.
A rework of the hardcore system has been announced. What follows may therefore change.
3.2 Why it matters #
The higher your hardcore tier:
- the bigger your ash multiplier;
- the more callboard quests pay, and that is where most of your income comes from (see chapter 5);
- the more XP mobs give. The gap between Normal and Hardcore I is roughly 8×. For that reason alone, leveling in HC1 is a genuine help;
- the more you loot: +1 loot per tier, so 6 times normal loot in Hardcore V.
3.3 Finding people #
Join world chat with the /join world command, then wait for raid callouts.
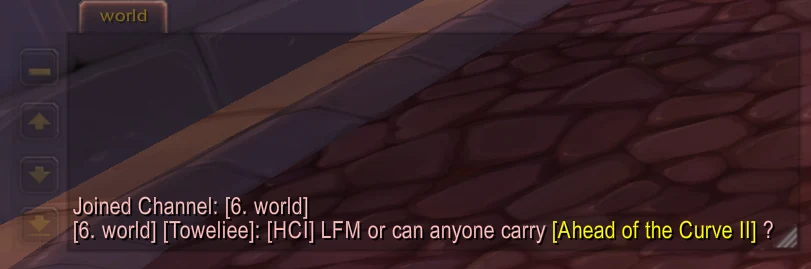
[HCI] LFM or can anyone carry [Ahead of the Curve II] ?, someone in Hardcore I looking to unlock tier II.Carries are usually advertised as LFM (looking for members): it means there is a big player able to solo the raid. The linked achievement tells you what is being run:
| Achievement linked | Unlocks | Raid involved | To be done in |
|---|---|---|---|
| Ahead of the Curve I | Hardcore 1 | Naxxramas | Normal |
| Ahead of the Curve II | Hardcore 2 | Ulduar | HC1 |
| Ahead of the Curve III | Hardcore 3 | Trial of the Crusader | HC2 |
| Ahead of the Curve IV | Hardcore 4 | Icecrown Citadel | HC3 |
| Ahead of the Curve V | Hardcore 5 | The Ruby Sanctum | HC4 |
Sometimes the raid name is linked instead. So it is not a 100% reliable rule.
LFM = an existing group looking for members (this is the one you want).
LFG = looking for group, one person looking for an already formed group.
Reply inv in a whisper and you will almost certainly get an invite.
The WypeFlip guild runs the whole unlock chain HC1 → HC5 twice a week: Wednesday and Saturday.
Heads up: these runs are called in French. You are welcome to come, but you will need the language to follow the calls.
3.4 What you actually need to keep up #
To get carried: surviving, that is all
There is no minimum gear to be taken along on a carry. And if you die, you still keep what has been completed: that is not the problem.
The problem is that you can no longer chain runs. Dead, you become a hassle for the group, and nobody is going to wait for you. Unless you are in a guild, your evening ends there. Which is why staying on your feet matters:
- 70,000 HP minimum. Below that, you will not hold.
- 5 to 10 million ashes invested. Without that, surviving generally gets difficult.
No need to think about it: take as much survivability as possible, and nothing else. In practice, this affix set is enough to get through Malygos and Sartharion in Hardcore 5:
- Stalwart at ranks VI, V, IV and III
- Ironhide at ranks VI, V and IV
Seven pieces, seven affixes, all defensive. Ranks stack (see 2.4), so putting Stalwart on four times is not a waste: it is the whole point of this list.
At this stage, your damage does not matter at all: somebody else is killing the boss, your only job is to stay on your feet.
In Naxxramas, you can stay at the entrance and still get credit. It is the only raid where that works, all the others require staying alive.
To run the raids yourself: the DPS wall
Once you are no longer being carried but actually contributing, your damage decides which tier you can reach:
| Tier | DPS required |
|---|---|
| Hardcore 3 | 3 to 4M |
| Hardcore 4 | 10 to 15M |
| Hardcore 5 | 20M and up |
Getting past 5 million DPS requires being fully geared, optimised, and having your affixes (see 2.4). It is not a question of level, it is a question of preparation.
How long it takes
With a guild running them back to back, the full HC1 → HC5 unlock takes 2 hours. Without an organised group, count on several sessions and a few hours.
04 End game: prestige mode #
Think of prestige as a New Game +: it was added for players who had already done everything.
4.1 The mistake not to make #
Do not prestige if you are new. This is THE trap new players fall into, and they then struggle to ever get strong.
This mode was not designed to speed up a beginner's progress, but to extend the game for people who had already finished everything.
4.2 When to start #
The rule: all four of the following boxes must be ticked. Without that, it is a bad idea.
4.3 Why prestige at all #
Because it is a very strong mode: it permanently raises your ash collection percentage, up to a maximum of 10,000%. Which is BROKEN.
Concretely, at +20% per prestige done at the minimum threshold (see 4.4), that cap represents 500 prestiges. In other words you have plenty of room: there is no reason to ration.
This percentage does not account for the % added through achievements. Before prestige arrived, achievements were the only way to get a favourable %; now that this has changed, there is no need to do them.
4.4 Traps to avoid & how to farm #
The loop
Once you are in:
- Level up as fast as possible (see chapter 1).
- Farm the 10,771,440 ashes (the famous "11M") with the level 80 callboard quests in Wintergrasp.
- Kill yourself, then start a new prestige.
There are two distinct phases, do not mix them up.
When you are starting out, crates are just a way to make ashes: open them as they come, there is nothing to optimise.
When you switch to prestige, change method: hoard your crates and open them during the push to the threshold. It shortens the cycle noticeably, and it matters most for your first prestige, the hardest one to absorb since no multiplier is carrying you yet.
Between the two, count on roughly two days of playtime, in the /played sense.
What prestige takes away from you
This is the question everyone asks before committing, and the answer is scattered all over the place. Here it is at a glance:
| What you keep | What you lose |
|---|---|
| Your world tier, so HC5 stays unlocked | Your level: back to 1 |
| The skill tree's permanent points, Borrowed Power included | The entire rest of the skill tree, wiped |
| Your gear and its affixes | The ashes burned to trigger the prestige |
| Your Orbs of Lost Memories | Your Echoes page, except permanent echoes |
| The multiplier gained, permanently | The beginner bonus on crates, once past ~450% |
You keep your world tier: HC5 stays unlocked (see 3.1). This is not a server restriction.
What makes you weak is that your entire skill tree is wiped, with the sole exception of permanent points. So you lose most of your stats in one go.
Consequence: you can still set yourself to HC4, you will simply get one-shot. It is a stat wall, not a lock, but until you have bought everything back, HC4 raids are out of reach.
This is exactly the problem the permanent skill tree (2.5) solves, which is why you need it unlocked before you prestige.
The exact multiplier formula
This is the point everybody misses, and it is entirely calculable. The multiplier gain depends only on the ashes you burn at the moment of prestige, and it follows a square root: every extra ash pays less than the one before.
gain % = round up ( 20% × √( ashes burned ÷ 10,771,440 ) )
Two numbers to remember:
- 10,771,440 ashes, the minimum threshold to prestige. This is the famous "11M", and it gives exactly +20%.
- 400M ashes, the cap. Beyond that, burning more gives nothing at all: you plateau at +122%.
Nothing else enters the calculation: not your prestige level, not your current multiplier, not your hardcore tier. A prestige at threshold gives +20%, whether you are at 0% or 5,000%.
Multiplier gained
What a prestige pays you, in percentage points
Return
Percentage points gained per million ashes burned
Ashes burned at the moment of prestige, in millions
Move your cursor over the curves to read the exact value at any amount. They are plotted straight from the formula, not from measurements. The real gain is rounded up to the next integer, which in practice makes it a staircase of one-point steps.
Above the cap, the extra ashes burned are simply lost. Prestiging at 1 billion gives exactly the same as prestiging at 400M: +122%, and you threw away 600M.
The charts reason per million ashes. But what decides is time. Here is my full cycle, timed, at 1,000% multiplier:
| Step | Duration |
|---|---|
| Level 1 → 80 (quest chain then mobs, see 1.2) | 6 min |
| Farm the 10.77M on the callboard | 9 min |
| Travel, reset and prestige | ~5 min |
| Full cycle, tryharding | ~20 min |
For scale, a callboard quest pays ~3M in 2 to 5 minutes: the threshold is therefore barely four quests.
Every cycle pays +20%, always. What your multiplier changes is not the gain per prestige, it is the speed: the higher it is, the faster the 10.77M comes in, so the more cycles you chain. At 1,000%, that works out to 3 cycles an hour, so +60% multiplier per hour.
Compare: going for 200M on the callboard takes roughly 67 quests, about 4 hours, for +87% once. In those same 4 hours, the short loop gives 12 prestiges, so +240%. The gap is a factor of 3.
It was established by the community from in-game measurements, and it lines up perfectly with the 10,771,440 threshold and the 400M cap the server displays.
Conclusion: on paper, always prestige at threshold, at 10,771,440 ashes. Piling up hundreds of millions before prestiging is not an aggressive choice, it is simply less profitable, and past 400M it is pure waste.
The raid variant: one raid, one prestige
Spamming at threshold wins if your time is elastic. It assumes you can chain 20-minute cycles back to back, and it eventually gets tedious: you gain a prestige level every 20 minutes without ever feeling anything.
The other path goes through Hardcore 5 raids. A raid quest pays ~31M in my case, three times the threshold. The rule fits in one sentence: each raid funds exactly one prestige, and you trigger it straight away.
And since 10-man and 25-man are two separate lockouts, each raid gets run twice: six prestiges per cycle, for a single reset paid (see 7.4).
This figure was measured at 1,000% multiplier, in Hardcore V. Yours will be different: a raid quest's reward depends directly on your multiplier and your hardcore tier (see 5.2).
Look at what the callboard actually offers you, and redo the maths with that number. Everything else in this chapter still holds: it is the reasoning that matters, not the absolute value.
| Method | Ashes burned | Total gain | Return |
|---|---|---|---|
| 6 prestiges, one per raid | 6 × 31M | +210% | 1.11%/M |
| 1 single prestige, all 6 raids stockpiled | 188M | +84% | 0.45%/M |
The same work, two and a half times the result, simply because you did not wait. The square root curve is what produces this: six small prestiges crush one big one.
You feel the level up. At +35% in one go instead of +20% every 20 minutes, progress is visible, and that is what will keep you going over time.
And the ashes cost you nothing extra. If you are raiding anyway, they come as a by-product, not as extra work.
The full loop, with the exact order of steps and where the reset goes, is detailed in 7.4.
Some people aim for a single large prestige for the satisfaction of a round number: 60M gives +48%, and 67.3M gives exactly +50%.
That is playable, but know what it costs: 0.79 percentage points per million, against 1.11 for the per-raid loop and 1.86 for threshold spam. You are paying for comfort.
Alternative method: eternal elementals
This method is only worth it from 2,000% multiplier onwards. Below that it is a trap: you will sink enormous time into it for a gain that does not follow.
There is another approach: farming eternals (fire, water, earth, air, shadow, life) to land the callboard's crafting quests.
You want 200 of each, having all of them is essential, and you should budget 20,000 gold to reroll quests on a loop until the crafting ones show up.
- lifeThornvine Creeper
- shadowShadow Revenant
- waterWater Revenant
- earthEarthbound Revenant
- airTempest Revenant
- fireFlame Revenant
If you have something better for farming eternal life, I will take it: say so on the WypeFlip Discord and tag @Macumba, in French or English.
05 Optimal ash farming #
The same objective at three points in the game, except the return changes by a factor of 100 between the start and the end.
5.1 Early game: dungeons, across several characters #
At the start you need your first millions and some gear. You are still very weak, so the simplest route stays queued dungeons.
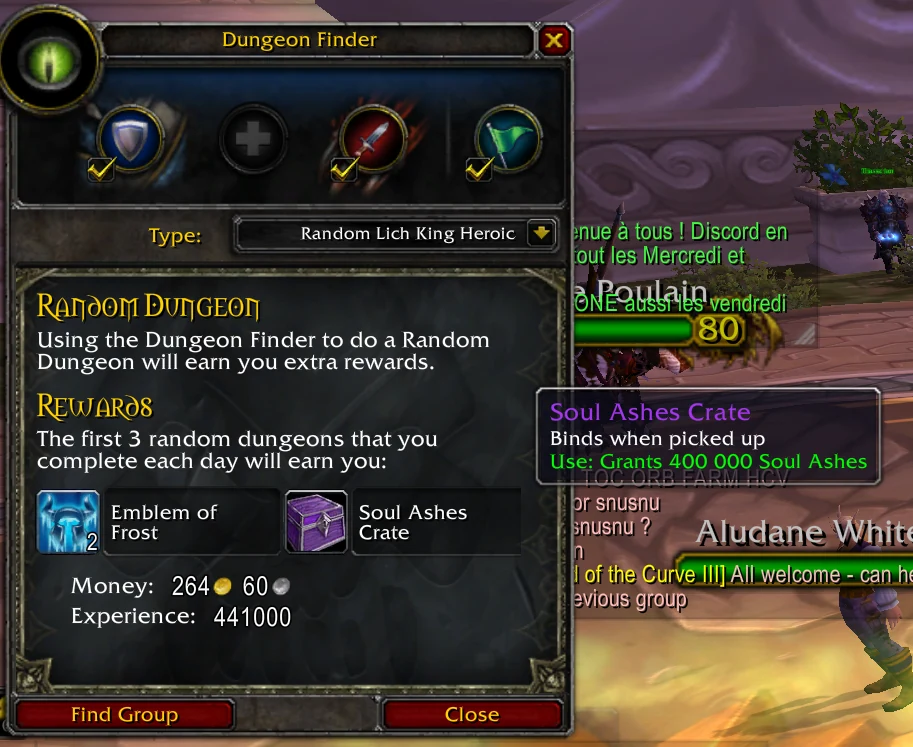
The first 3 dungeons each day give a Soul Ashes Crate. That is the backbone of early income, and it wraps up in about fifteen minutes without pushing.
The absolute beginner's method: throwaway characters
If you are truly at the very start, you cannot hold a level 80 run yet. There is a loop that sidesteps the problem entirely, and it is the most efficient one for climbing out of the hole:
- Create a new character, ideally a paladin: it queues as DPS, tank or healer, so its dungeons pop far faster.
- Take it to level 15 with quests, which goes very quickly.
- Queue 3 dungeons and open the crates: 3 × 40k ashes, so 120k for that character.
- Kill yourself, then start over on a new character and repeat.
Repeat until 500k to 1M ashes, so 5 to 6 characters. By then you have enough to buy the XP bonuses and above all some resistance, which is what makes you sturdy. From there, a level 80 run becomes viable.
It is the most effective method, it is not the most fun: you are going to replay the same opening five times. If it grates on you, skip straight to the routine below, you will still get there, just more slowly.
This method is the starting point of chapter 7, which chains every following step in order all the way to prestige spam.
The normal routine, once you are level 80
A crate's value scales with your level: 40k at level 15, against 400k at level 80. That is a factor of 10, and it is the entire point of the method above: it exists to get you past that tier fast, not to keep you there.
At level 80, a crate is therefore worth 400k ashes base. But a beginner bonus doubles it as long as your prestige multiplier is under ~450%: so 800k per crate, and 2.4M a day.
Once past ~450%, the bonus drops off and you are back to 400k per crate, so 1.2M a day. In other words: this income source is twice as generous exactly when you need it most.
Take the chance to pick up some gear along the way. And if you level several characters, you collect the crates as many times as you have characters: it is the simplest lever for multiplying this daily income.
It is perfectly fine to not bother and skip straight ahead.
Do not run Halls of Reflection: it is far too long and nobody wants to do it. Leave the group, wait a minute, and requeue.
5.2 Mid game: dungeons then callboard #
Do your dungeons for the day, then move to the callboard: the board next to the inns.
From it, take the world wide quests, meaning the ones where you have to kill mobs. The number of ashes you get depends directly on two things:
- your ash multiplier;
- your difficulty tier (Hardcore I to V).
Always set the highest tier you can hold. The higher your multiplier and the higher your active hardcore, the faster it climbs. So if you can: go Hardcore 5.
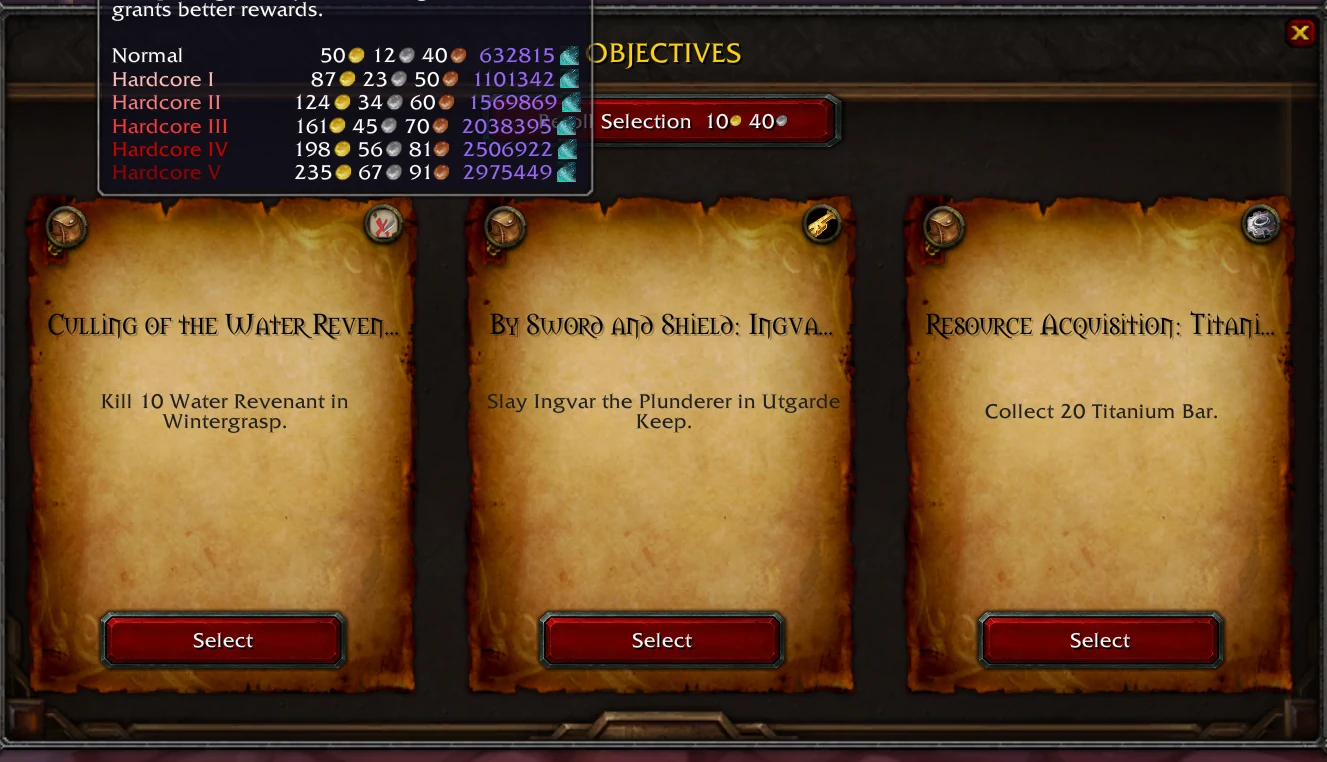
Reroll on a loop to get quests in the same area, and preferably in Wintergrasp. Travel time is what kills your return, not the killing.
If you are willing to put some money into the game, you can buy the summonable callboard and place it wherever you want. It also shows up on the auction house sometimes for 200k to 300k gold.
5.3 Late game: callboard then HC5 raids #
The loop: run the basic callboard to get some ashes going (10 to 50M with a bit of gear), then happily get carried through Hardcore 5 raids. This is by far the biggest earner.
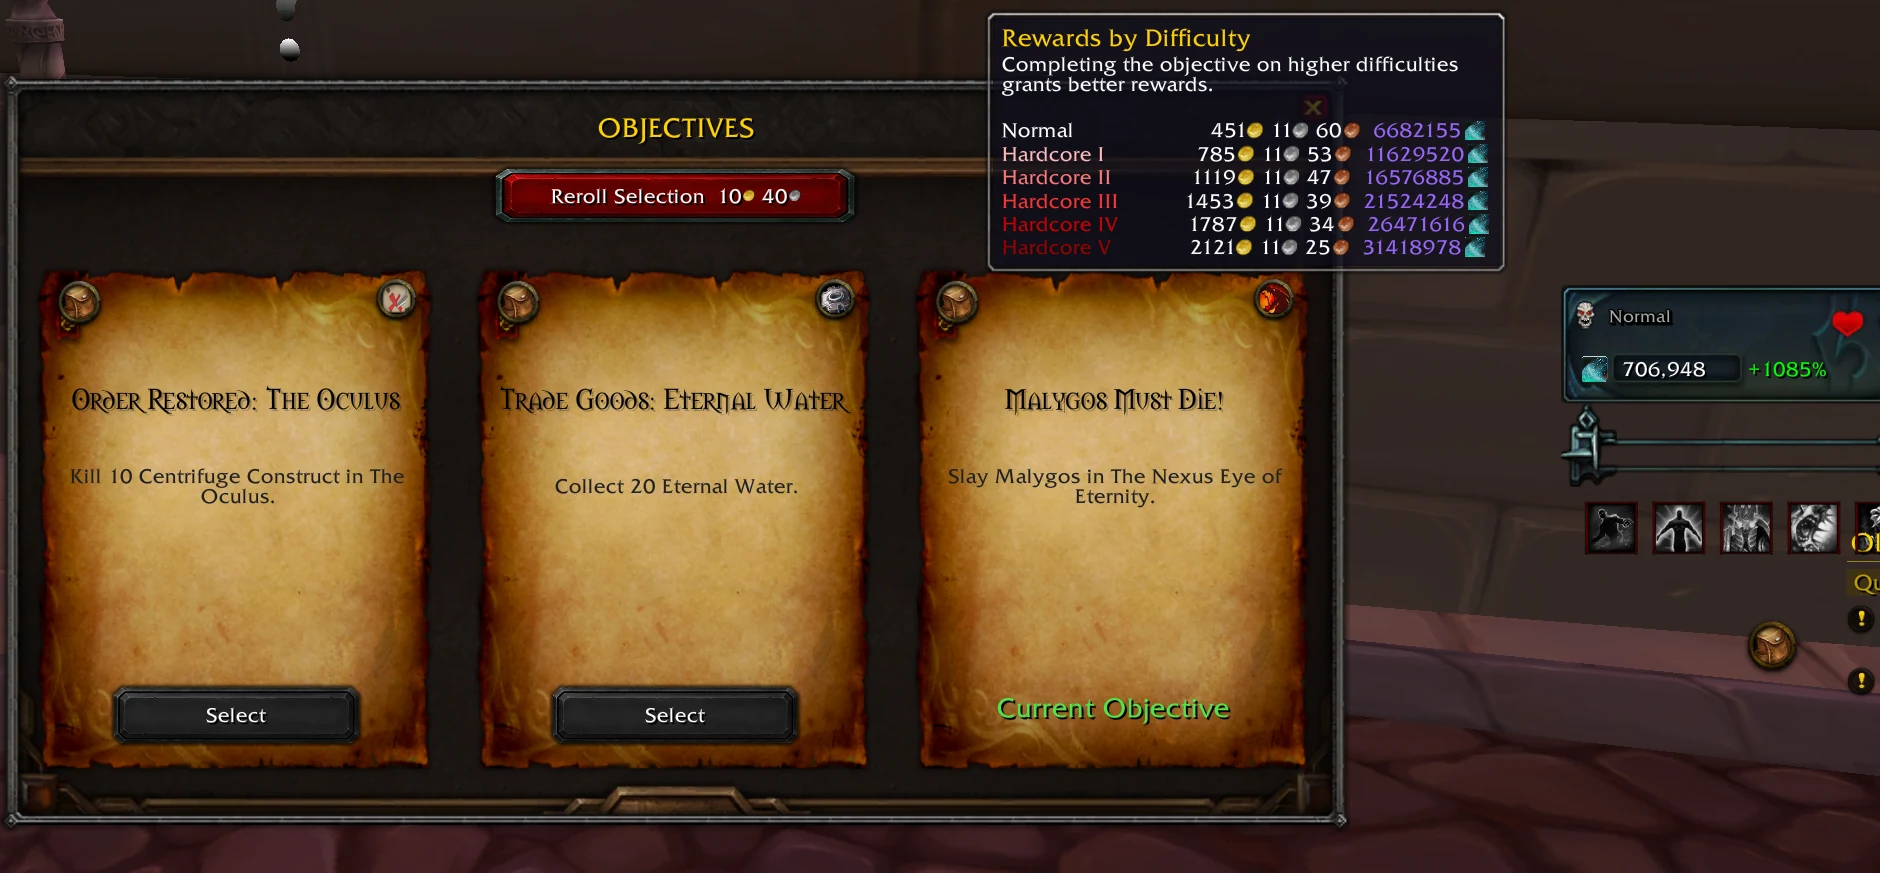
The only 3 quests to do
Pick them up beforehand if you can, or ask for a share inside the raid.
- easiestNaxxramas, the easiest raid to get carried through. Even with very little health you cannot die, which is not true of the others.
- technicalMalygos, tip: to get out of the raid once you are stuck on the drake, fly high into the sky, dismount, and teleport away (to Dalaran) during the fall. If you mistime it, you die.
- riskySartharion, tip: be reasonably sturdy, you may well die. The affix set that is enough is in 3.4.
Finding the group
Watch /world for LFM HC5 callouts, they come up very often.
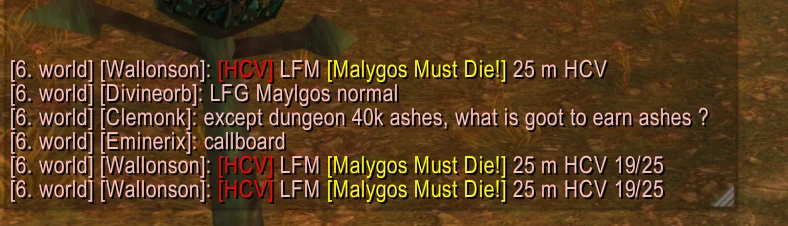
[HCV] LFM [Malygos Must Die!] 25 m HCV 19/25, a group of 25 in Hardcore V with 19 spots filled. Reply inv in a whisper.Reset and start over
Once your lockouts are used up, you can reset every raid and start over: press o → Raid tab → Clear IDs.
10-man and 25-man are two separate lockouts. The 3 quests above therefore run six times before a reset is needed: each raid in 10, then the same in 25.
Resetting after three raids means paying twice as many resets for the same number of runs (see 7.4).
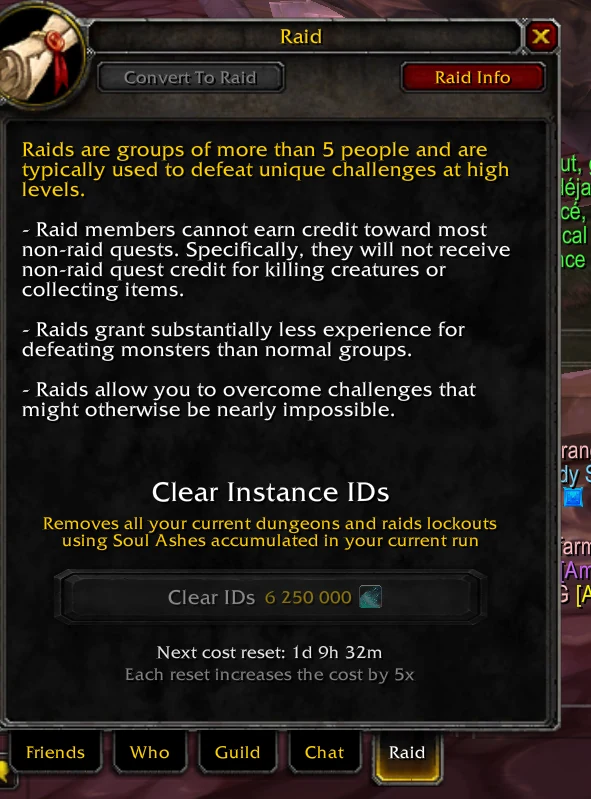
To pick the raid quests up again, you have to die. Otherwise it is impossible to take them.
Each reset multiplies the price by 5. When it gets too expensive, you have to switch to other characters to keep the loop going.
With this method it is possible to farm 500 million in a single day with only 500% multiplier. Which is enormous.
06 Gold farming #
Gold serves one purpose above all: paying for your affixes. Budget generously.
6.1 What you need #
The best setup for these farms is having access to Hardcore 5 and autoloot.
You also need to be able to sell without running back and forth: ideally the summonable vendor, or at minimum the vendor mammoth.
6.2 Mob routes that pay #
Several routes work well because they are dense in mobs. Run them at the highest hardcore you can: the loot multiplier does all the work (+1 loot per tier, so ×6 in HC5).
- Bonestripper Vulture
- Umbral Brute, usually people around.
- Trapdoor Crawler, more relaxed, doable in small mob packs. The drop to aim for is Iceweb Spider Silk, which sells very well straight to the vendor.
There are surely other spots and other mobs, but I have not found anything genuinely convincing. If you have a better route, say so on the WypeFlip Discord and tag @Macumba, in French or English.
6.3 The callboard & raids #
The simplest method: run the callboard. Each quest gives a few hundred gold, and a Hardcore 5 raid pays 2,000 gold.
Chained together, these quests push the counter up very fast, and you are making gold at the same time as the ashes from section 5.3. It is the same loop, there is nothing extra to do.
07 The speedrun: getting strong from zero #
The six previous chapters explain each mechanic separately. This one gives the complete route, in order, from a blank character to prestige spam. It is what I would do again if I started over today.
Four steps, in this order. Each one has a numeric goal: until you hit it, you stay on that step. That is what avoids the server's classic trap, prestiging too early (see 4.1).
7.1 Step 1: bootstrapping with throwaway characters #
Goal: 500k to 1M ashes, without ever going past level 15.
You have nothing, so you cannot hold a level 80 run. We sidestep the problem with characters we throw away:
- Create a character and take it to level 15, as fast as possible. Roll a paladin: it can queue as DPS, tank or healer, so its dungeons pop far faster than anyone else's. That is where most of the time is won.
- Queue the dungeons to collect your 3 crates, so 3 × 40k ashes.
- Kill yourself, then start over on a new character and repeat.
Repeat until 500k to 1M ashes. Spend them immediately on two things and nothing else: the XP bonuses, and enough to be sturdy (see 1.1).
You are going to replay the same opening several times. It is the fastest method, it is not the most entertaining. If it grates on you, just level one character to 80: you will still get there, only more slowly.
7.2 Step 2: the real character, and the first millions #
Goal: level 80, then a daily income that runs on its own.
- Get to 80 with the XP bonuses bought in step 1, the rest of the Dalaran quests (see 1.2) and the mob zones (see 1.3).
- Your 3 daily dungeons, every day: this time the crates are worth 800k each, so 2.4M a day thanks to the beginner bonus (see 5.1).
- The callboard for your first millions: the mob-killing quests, at the highest hardcore you can hold (see 5.2).
A crate goes from 40k at level 15 to 800k at level 80. That is a factor of 20. Step 1's bootstrap has exactly one purpose: getting you to that tier fast enough.
7.3 Step 3: unlocking hardcore and gearing up, at the same time #
Goal: HC5 unlocked, a decent Echoes page, affixes applied.
These five workstreams move forward together, not one after the other. That is the most important point of this step: each one feeds the others.
- Look for groups constantly to unlock HC1 → HC5, even while weak. There is no minimum gear to get carried, and you pick up good gear along the way (see chapter 3).
- Echoes come on their own from the raids you are chaining. As soon as you like your page, save it (see 2.2).
- Affixes: ask people around you, or buy them. That is what turns decent gear into a real character (see 2.4).
- HC5 raids whenever one forms, and above all Naxxramas, which runs at pretty much any time. Take the HC3 or HC4 quests too as soon as you can hold them.
- The permanent skill tree: put a little in every time you have ashes sitting idle (see 2.5). Nothing urgent, except Borrowed Power, which has to be in place before step 4.
You do not need to be good to be taken along: a big player solos the raid, you follow. In Naxxramas you can even stay at the entrance, and even dead you get credit (see 3.4).
So do not wait until you are ready to start: getting carried is how you become ready.
7.4 Step 4: the prestige loop, one raid equals one prestige #
Entry requirements: 100M ashes passed, acceptable gear and an acceptable Echoes page.
From here on, everything runs on a short loop. The principle: every HC5 raid funds exactly one prestige.
You are going to walk through HC5 raids while being weak. So build for survivability: Stalwart VI, V, IV, III and Ironhide VI, V, IV are enough for Malygos and Sartharion (see 3.4).
If you play paladin, you have bubble: save it for the dangerous moments, that is what keeps you from breaking the rhythm.
10-man and 25-man are two separate lockouts. A raid cleared in 10 does not lock the same raid in 25, and the other way around.
Concretely: each raid gets run twice before you need a reset. So you go from 3 to 6 prestiges per cycle, for a single reset paid. It is free, and it is the kind of detail people miss for weeks.
| Round | The raid | Then, in this order |
|---|---|---|
| 1 | Naxxramas in 10 | die → prestige |
| 2 | Naxxramas in 25 | die → prestige |
| 3 | Sartharion in 10 | die → prestige |
| 4 | Sartharion in 25 | die → prestige |
| 5 | Malygos in 10 | die → prestige |
| 6 | Malygos in 25 | reset raids → die → prestige |
| ↻ | Back to Naxxramas in 10 | and so on |
All of it is done in Hardcore 5: the 10 and 25 refer to raid size, not world difficulty. The order between raids is free, what matters is running six before paying for a reset.
Death always comes before the prestige. It is what makes the raid quest pickable again next round (see 5.3). If you prestige without having died, you break the loop.
The reset goes on round 6, once your six lockouts are used up, and before dying. It is what reopens all six at once.
An HC5 raid quest pays ~31M at 1,000% multiplier, far above the 10,771,440 threshold. Burned immediately, those 31M give +35%.
Do the maths over a full cycle: 6 prestiges at 31M give +210%, whereas a single prestige with the 188M stockpiled would only give +84%. The same work, two and a half times the result, simply because you did not wait.
Your own number will be different, but the ratio between the two does not move: redo the calculation with whatever reward your callboard offers (see 4.4).
Each reset costs 5 times the last one. After a few rounds, the bill becomes absurd.
At that point, do not pay: switch to another character and pick the loop back up with its own lockouts. The price returns to base after a little over a day.
7.5 The mistakes that cost the most #
| The mistake | What it costs | What to do instead |
|---|---|---|
| Prestiging before the 4 requirements are met | Skill tree wiped, one-shot in HC4, days spent buying it all back | Wait for HC5 + affixes + Echoes + 100M (4.2) |
| Waiting until you are strong to look for raids | Hardcore stays locked, so everything else runs at half speed | Get carried right away, even while weak (7.3) |
| Stockpiling several raids before prestiging | +84% instead of +210% for the same work | One raid, one prestige (7.4) |
| Neglecting the permanent skill tree | Every post-prestige run starts from nothing and becomes a chore | Borrowed Power before your first prestige (2.5) |
| Over-optimising your gear | Time lost on what matters least | Decent gear, then everything into affixes (2.4) |
| Paying for an overpriced reset | Tens of millions of ashes for nothing | Switch character (7.4) |
| Doing achievements for the % | Many hours for a bonus that has become marginal | Nothing: prestige replaced them (4.3) |
08 Addons #
Two addons genuinely change the pace of play. They replace no mechanic: they remove the repetitive handling you would do anyway, dozens of times per session. Both are by the same author.
8.1 AutoCallboard #
What it saves you: hours of rerolling the callboard by hand.
The principle: you tick the quests you want, hit start, and the addon rerolls on its own until it lands them. That is exactly the loop described in 4.4, with its 20,000g reroll budget, except you are no longer sitting there clicking.
Along the way it records every quest it sees (title, type, rewards) and sorts them by category: dungeon, raid, open world, profession. That is what makes the best use of it possible: you build a "profession quests" list once and from then on you only ever target those.
What else it does
- Named lists, organised into groups, and shared across all your characters.
- A difficulty tier per list, applied automatically.
- Current instance mode: inside a recognised dungeon or raid, it only rerolls for that instance's own quest.
- Gold tracking: total spend, current session spend, and the cost of the last quest obtained. Handy for knowing where you stand against your 20,000g.
- In a group: it automatically re-shares your last accepted quest, and can accept those shared by another AutoCallboard.
- Import/export of the quest catalogue from one install to another by simple copy-paste.
- A small 3-slot Echo bar to check and switch builds without leaving the panel.
Unzip into Interface/AddOns/ and enable it on the addons screen. No dependencies.
/acb roll starts rerolling, /acb stop stops it, /acb quests opens the quest window, /acb help the in-game help. Further commands set the NPC name, the maximum number of rerolls or auto-accept behaviour.
The addon is available in English, French, German and Spanish, and the language can be switched from the panel without restarting.
8.2 SkillTreeAutoLoad #
What it saves you: putting your whole tree back in one click instead of rebuilding it node by node.
It takes a snapshot of the tree as it stands, as many times as you want, each with its own name. One click to bring one back, and every node is re-selected for you at the right rank.
This is what makes the post-death routine bearable: your usual XP set (XP bonus, health, a bit of damage, regen) goes back in with one action. See 1.1 for what belongs in it. Essential as soon as you chain characters, and above all in the prestige loop.
How to use it
- Open the Soul Tree and select your nodes as usual.
- Click
...→ New save, and give it a name. - Later on, click Activate on the save you want.
- Press Apply Changes. Without it, nothing is committed.
What else it does
- Unlimited saves, named, and organised into groups you can rename, move and delete.
- Live cost in Soul Ashes, updated as you earn them, with the exact shortfall on hover.
- Shared across your whole account: every one of your characters sees the same list.
- Four languages, following your game client.
A save does not record multiple-choice nodes: those still have to be redone by hand.
Activation only ever adds selections, it never removes any. Your permanent points are therefore safe.
There is no export: you cannot send a save to someone else, unlike Echoes builds.
Extract the SkillTreeAutoLoad folder into Interface/AddOns/, then restart the game completely: a /reload is not enough.